Staking XPLL
You can stake XPLL with network validators to help secure the blockchain and earn rewards in the meantime. Follow the steps below to stake XPLL tokens with your ParallelChain account. You can also watch the video tutorial here.
Access Your Xperience Explorer Account
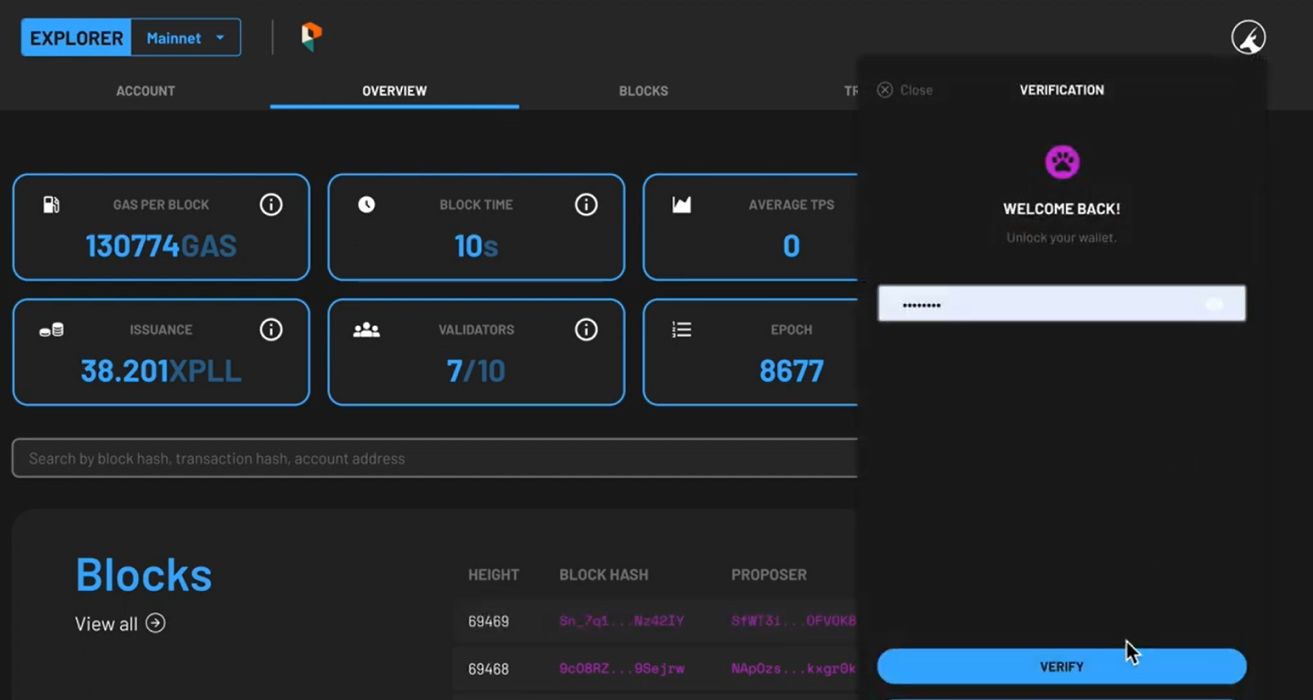
- Access the blockchain explorer, or click on the EXPLORER button on the ParallelChain homepage.
- To log in, click on the round icon on the top right hand corner of the explorer page and enter your password.
- Press the LOGIN button.
- If you do not remember your password, you can choose to log in with your recovery key. Once you have access to your account, you should set a new password through your wallet settings.
- Once you are verified, you can access your wallet account.
Depositing XPLL to Staking Wallet
Step 1: Select a validator
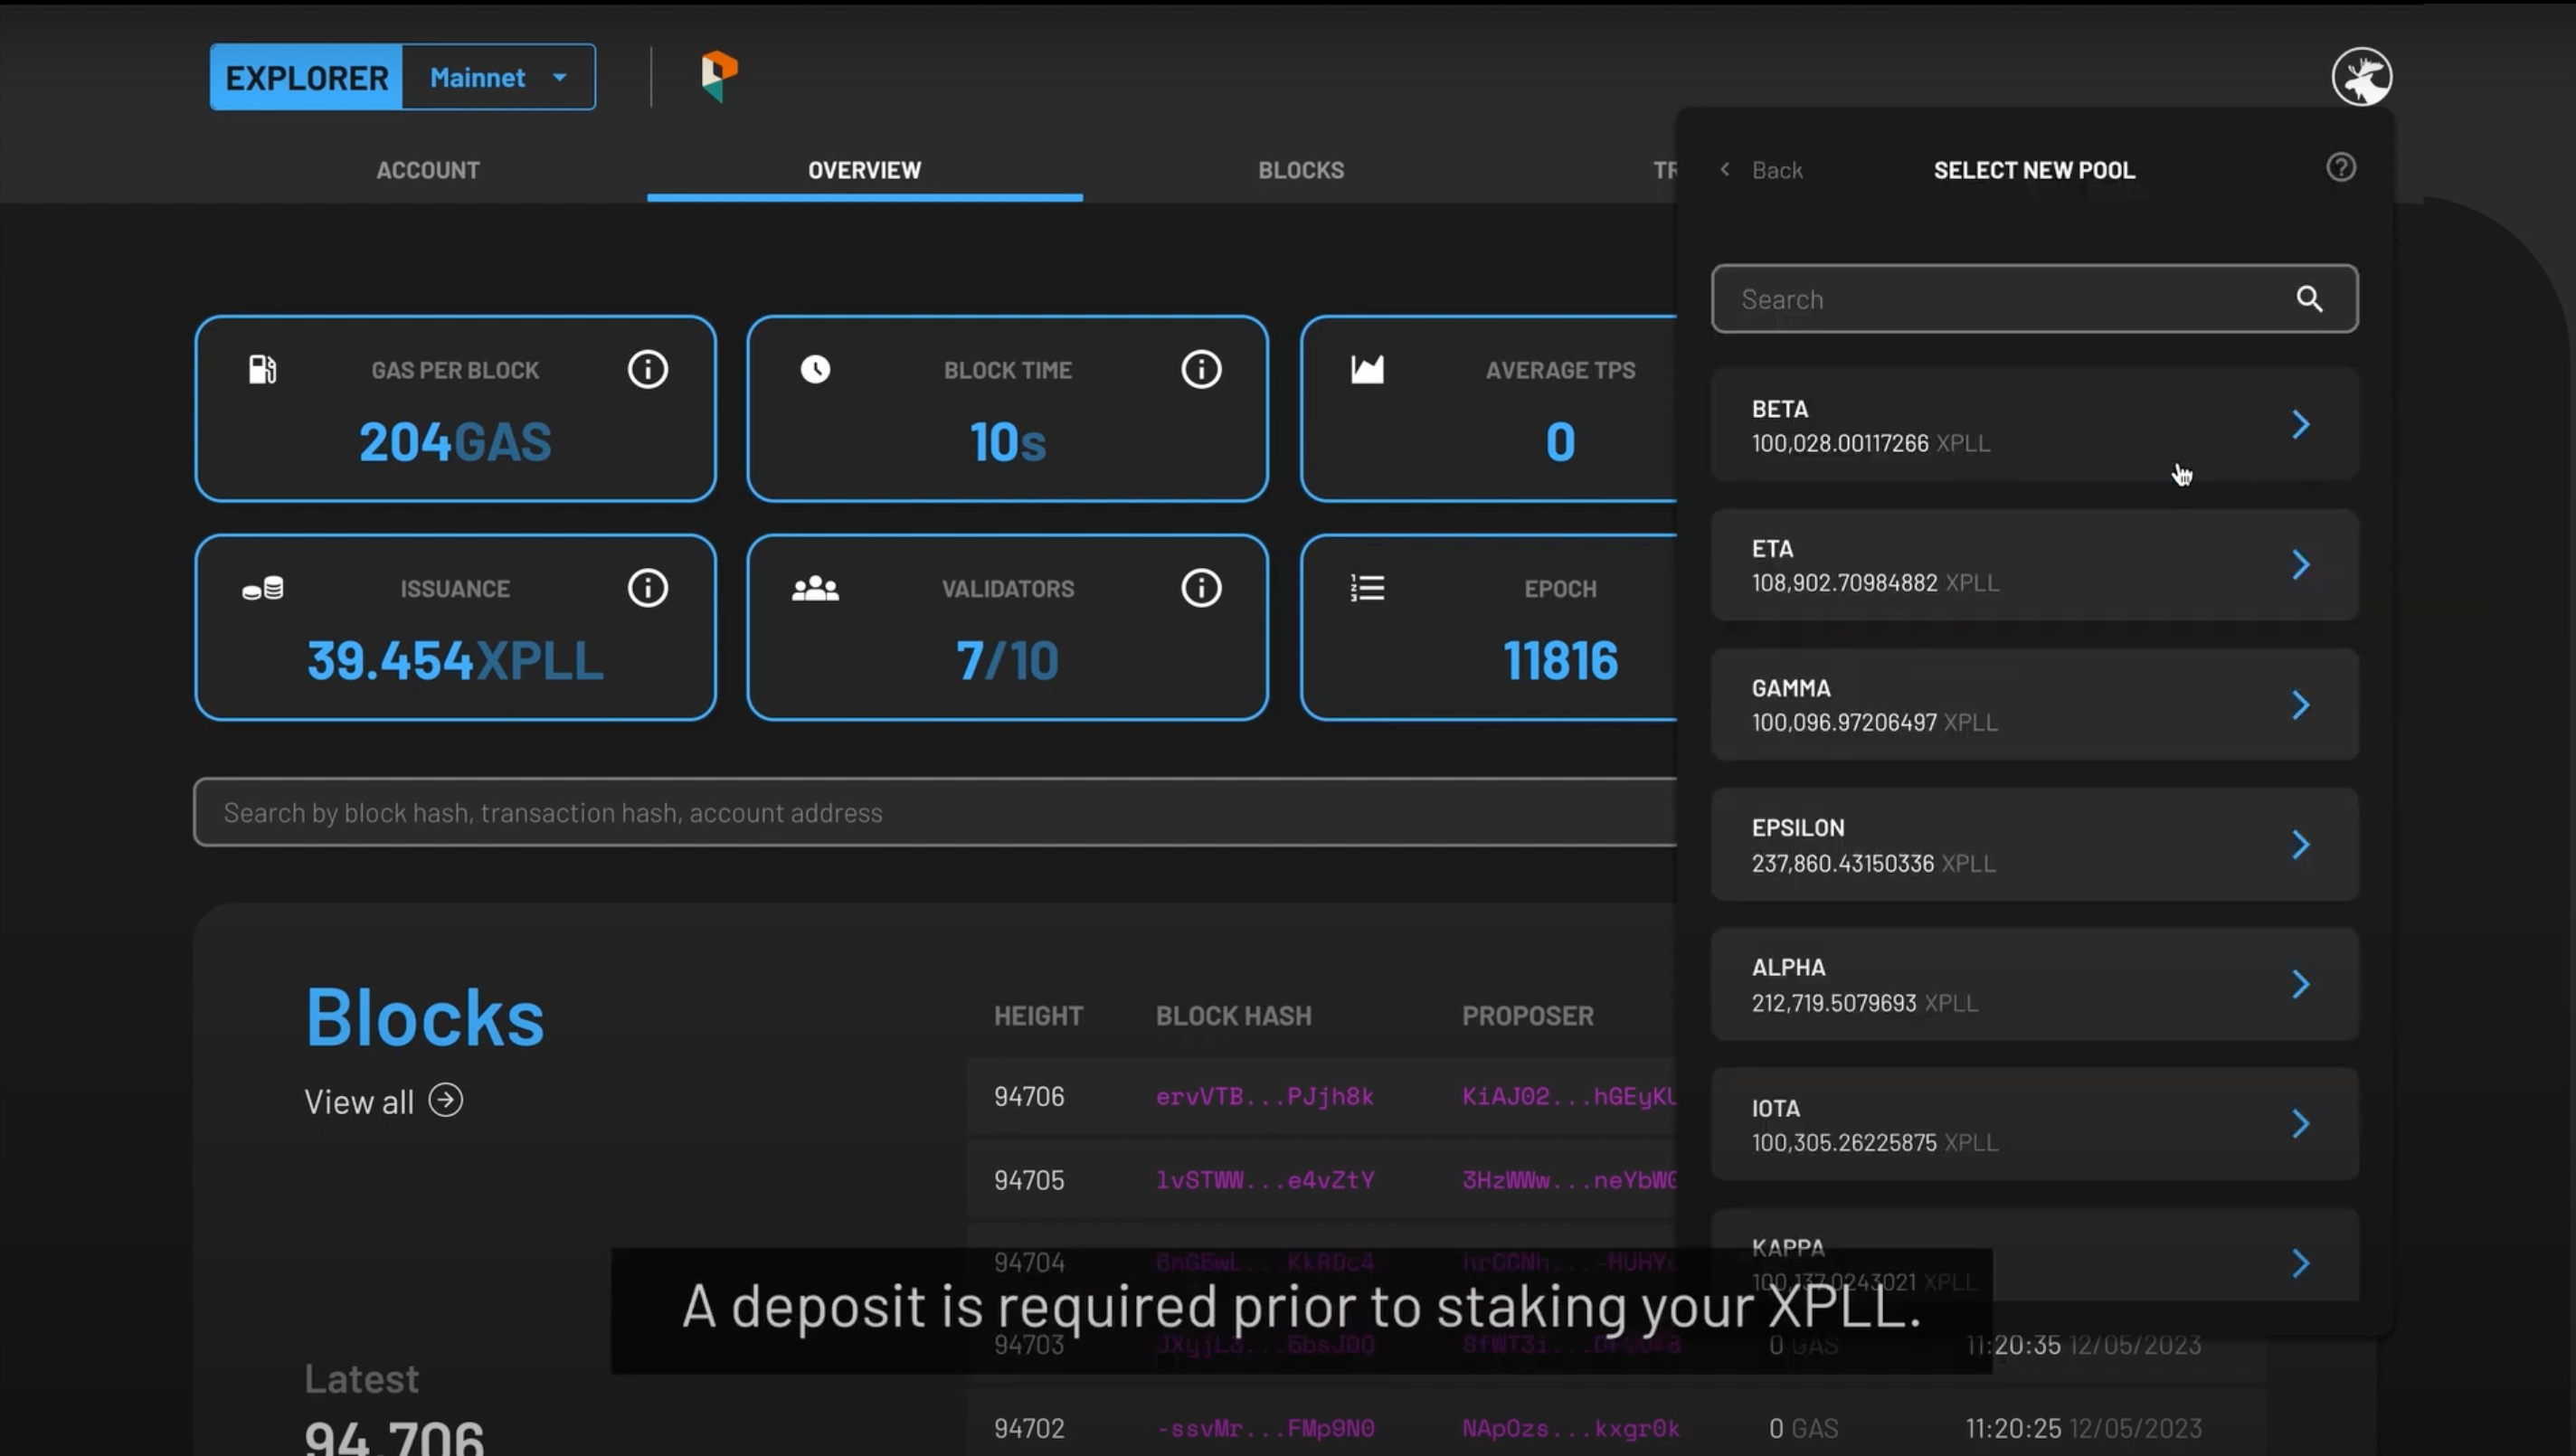
- Click the STAKE button which is located beside the SEND button.
- You will see the list of validator pools you can stake in.
- Choose from the list, or search for a specific validator via the search bar at the top labelled SEARCH OPERATOR ADDRESS.
Step 2a: Deposit XPLL Through Your Balance Account
-
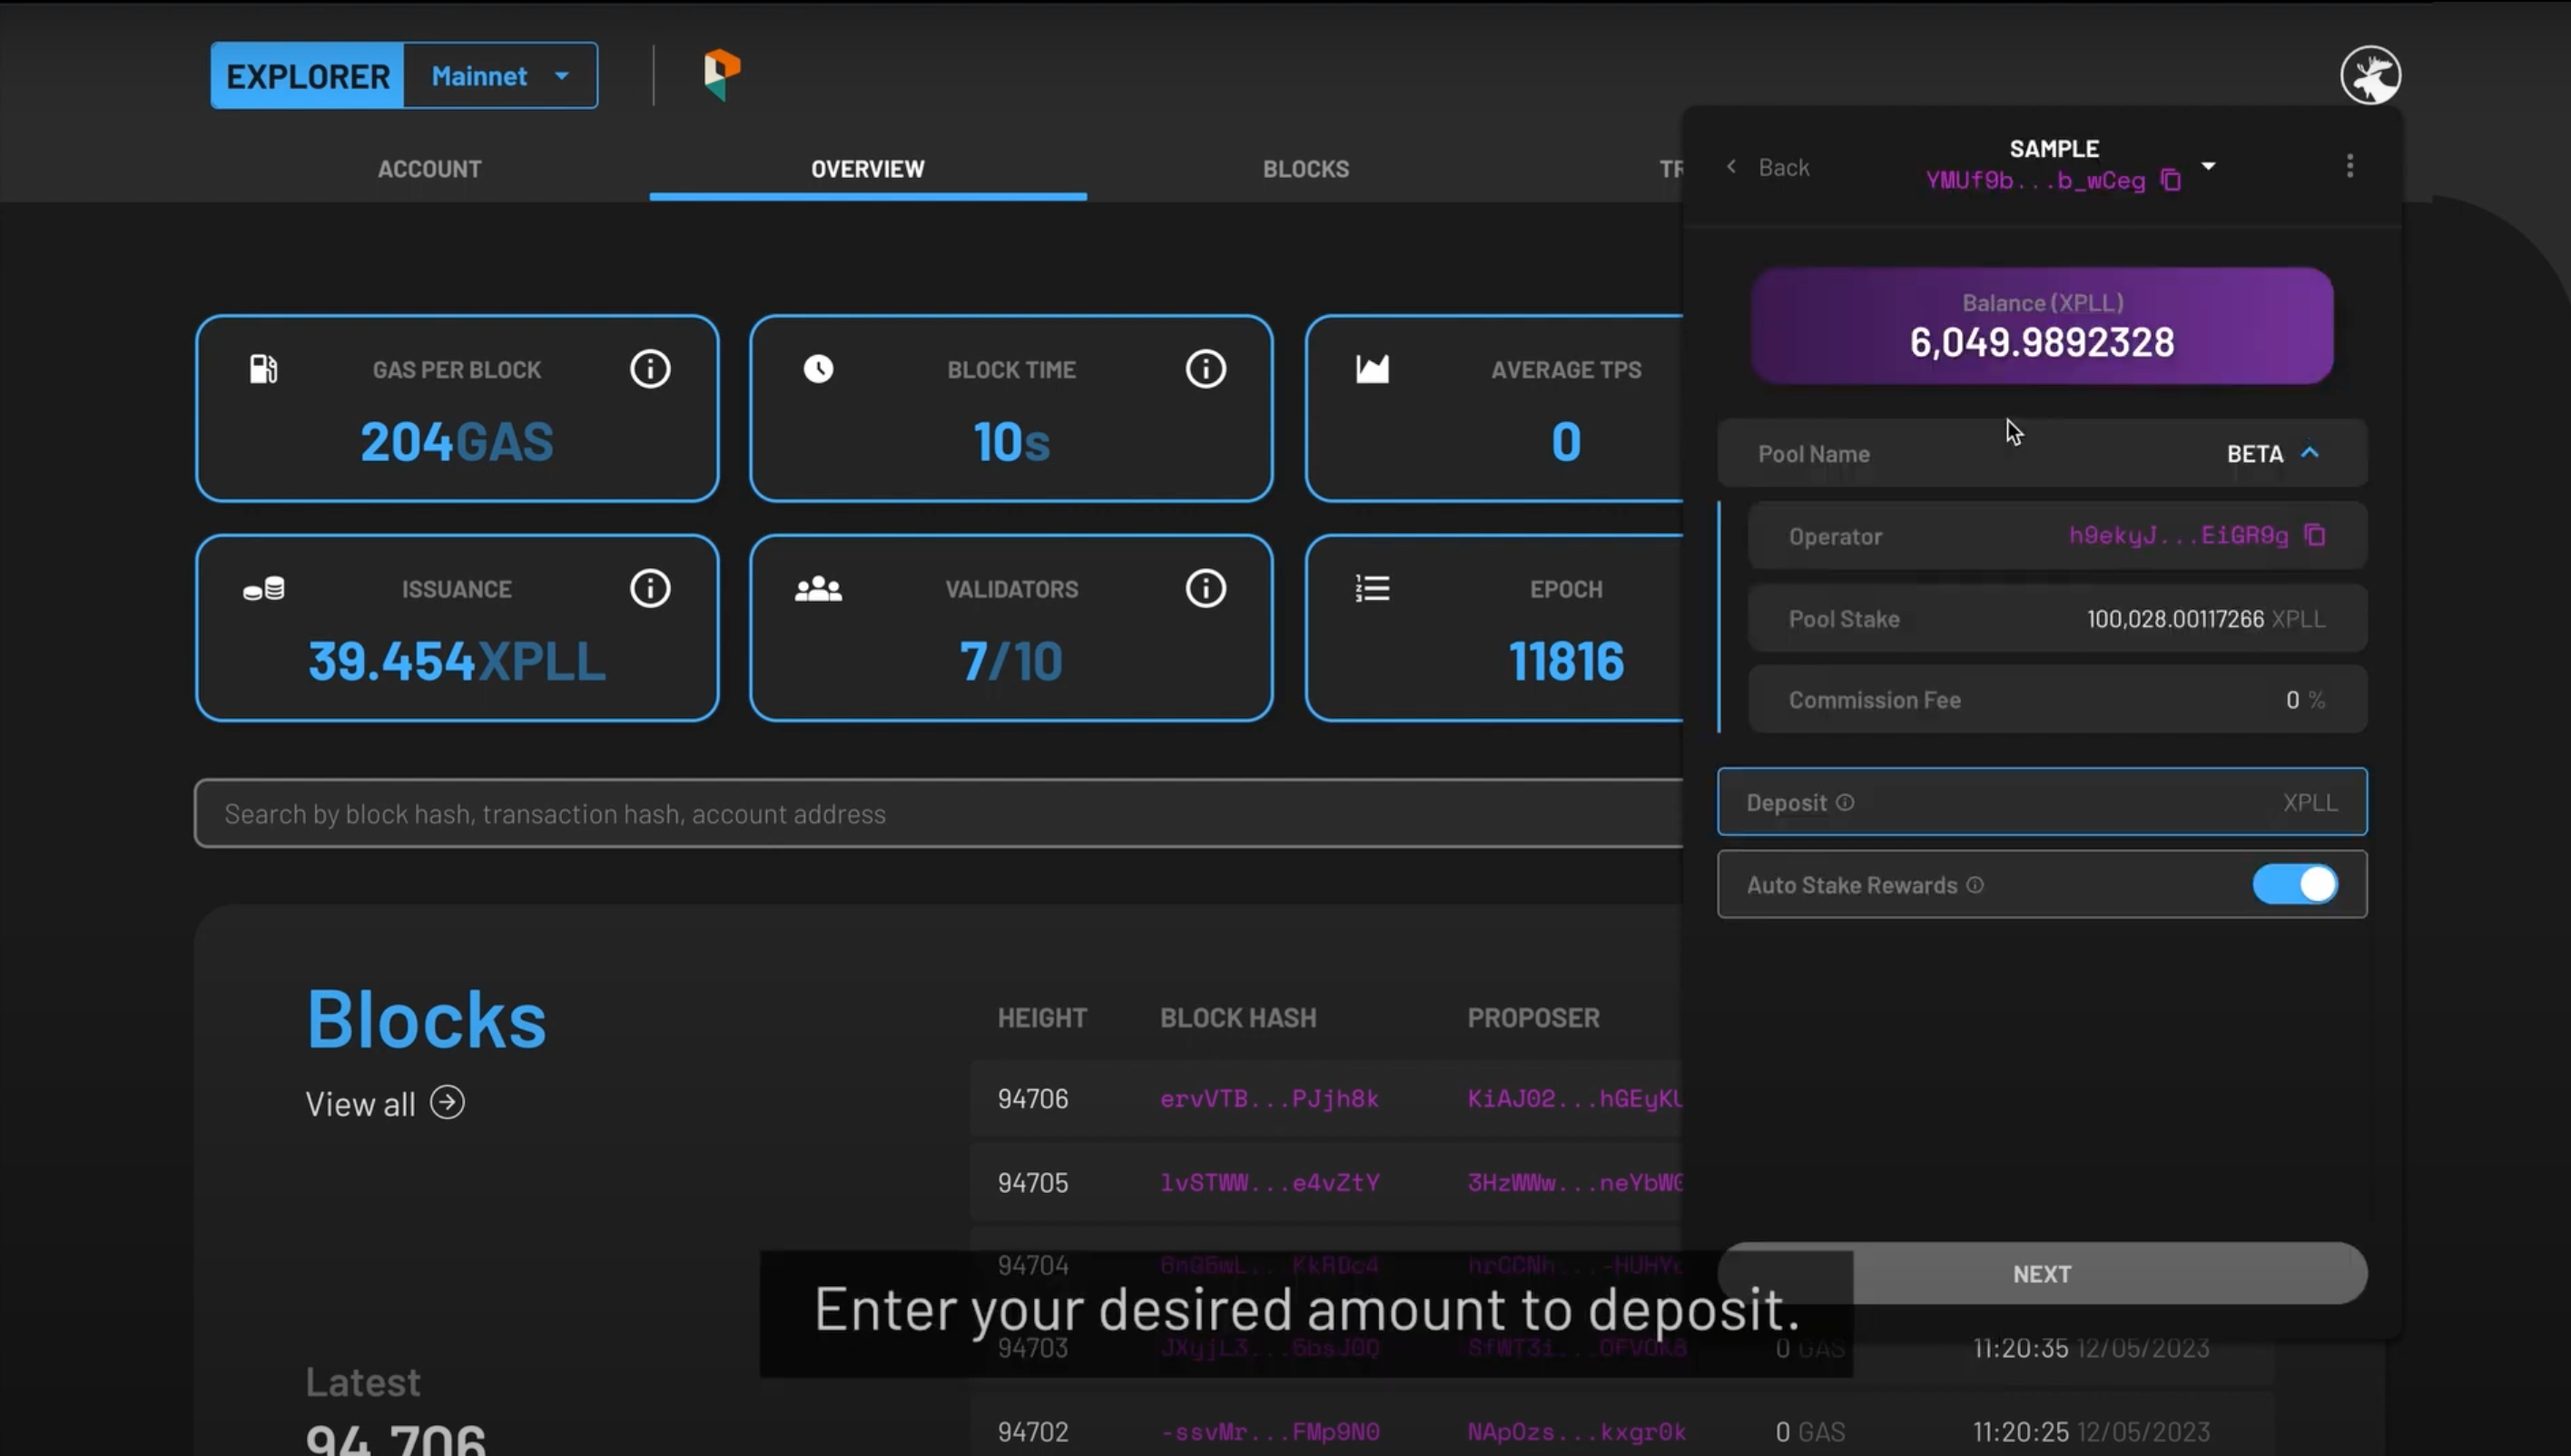
Once you have selected your desired validator, the details of the validator pool will be displayed.
-
Selecting the drop-down arrow under the POOL NAME field reveals the OPERATOR field, POOL STAKE field, and COMMISSION FEE field.
- OPERATOR - the validator's address is displayed here.
- POOL STAKE - the amount of XPLL staked with the validator is displayed here.
- COMMISSION FEE - the number displayed is the percentage of your rewards the validator will take as a commission fee.
-
To deposit your XPLL with the validator, enter the desired amount in the DEPOSIT field.
- If you would like to auto-stake your rewards, toggle the AUTO STAKE REWARDS field on.
Step 2b: Deposit XPLL Through Your Lock-Up Contract
-
Once you have selected your desired validator, the details of the validator pool will be displayed.
- LOCK-UP CONTRACT (XPLL) field and LOCKED field, your tokens that are still vested are shown here.
- Selecting the drop-down arrow under the POOL NAME field reveals the OPERATOR field, POOL STAKE field, and COMMISSION FEE field.
- OPERATOR field, the validator**s address is displayed here.
- COMMISSION FEE field, the number displayed is the percentage of your rewards the validator will take as a commission fee.
- COMMISSION FEE field, the number displayed is the percentage of your rewards the validator will take as a commission fee.
-
When you deposit your XPLL with the lock-up contract, the amount is automatically filled for you in the DEPOSIT field.
- If you would like to auto-stake your rewards, toggle the AUTO STAKE REWARDS field on.
Step 3: Confirm Your Transaction
-
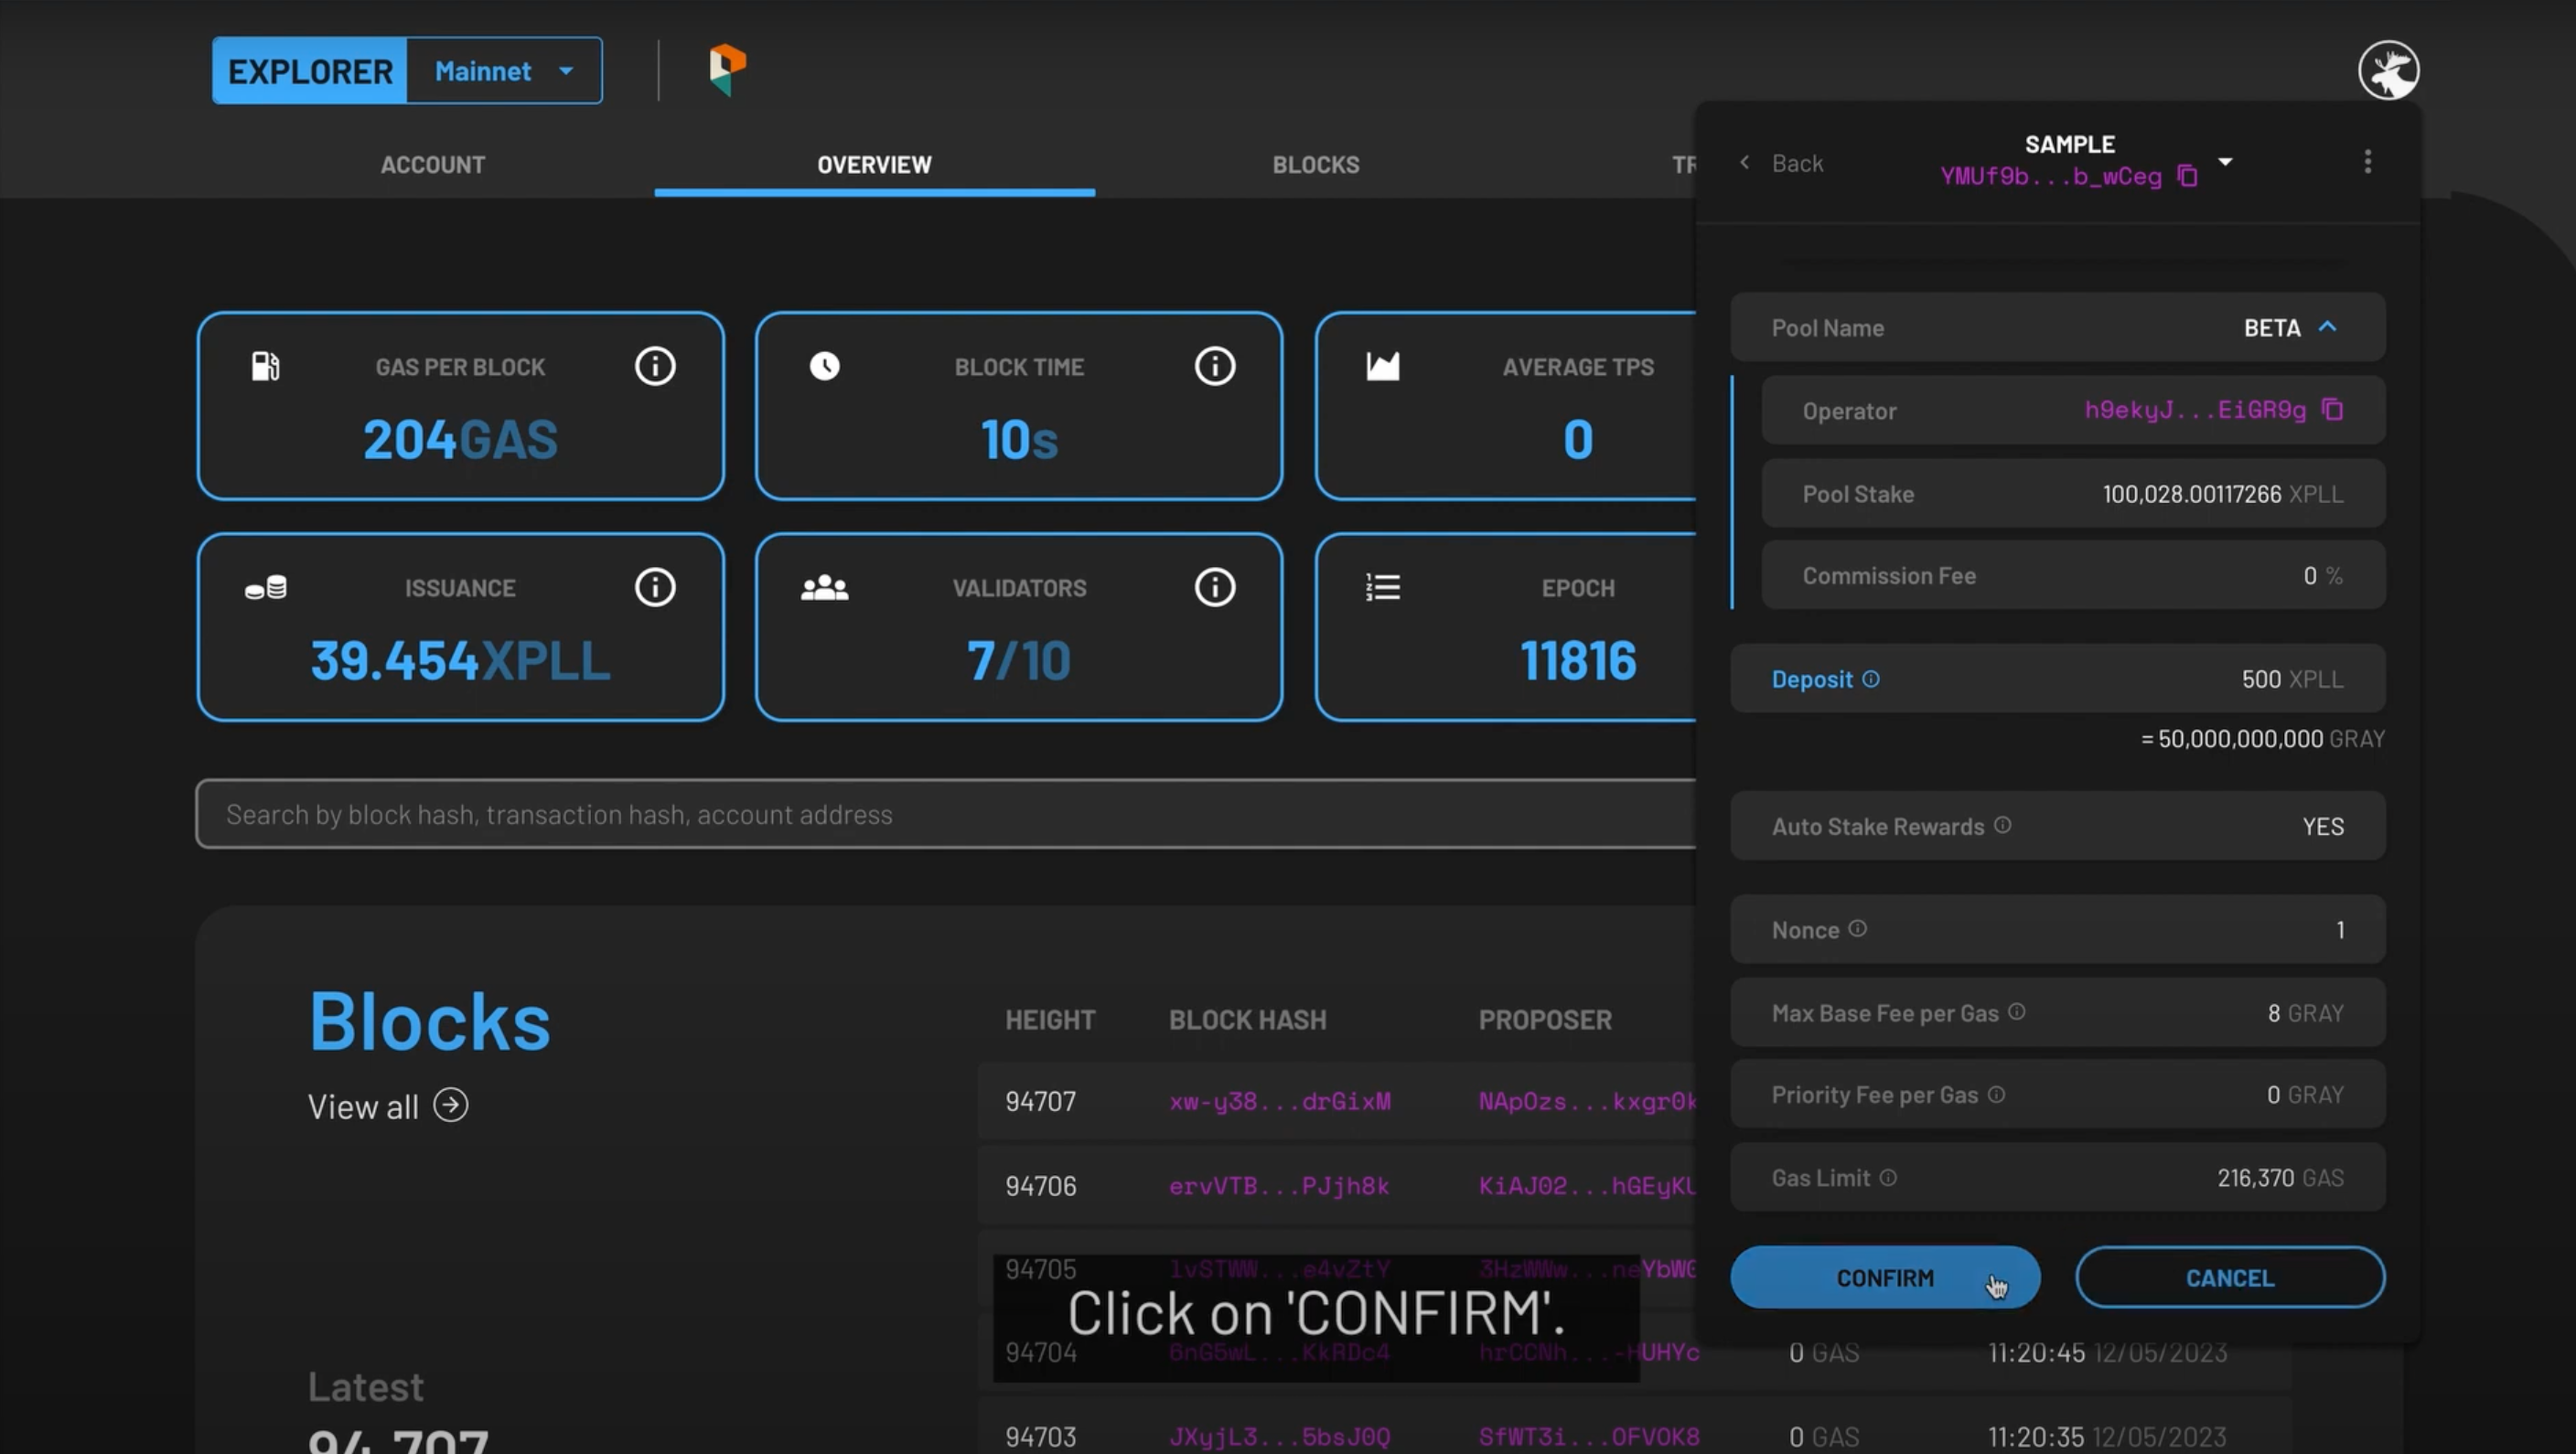
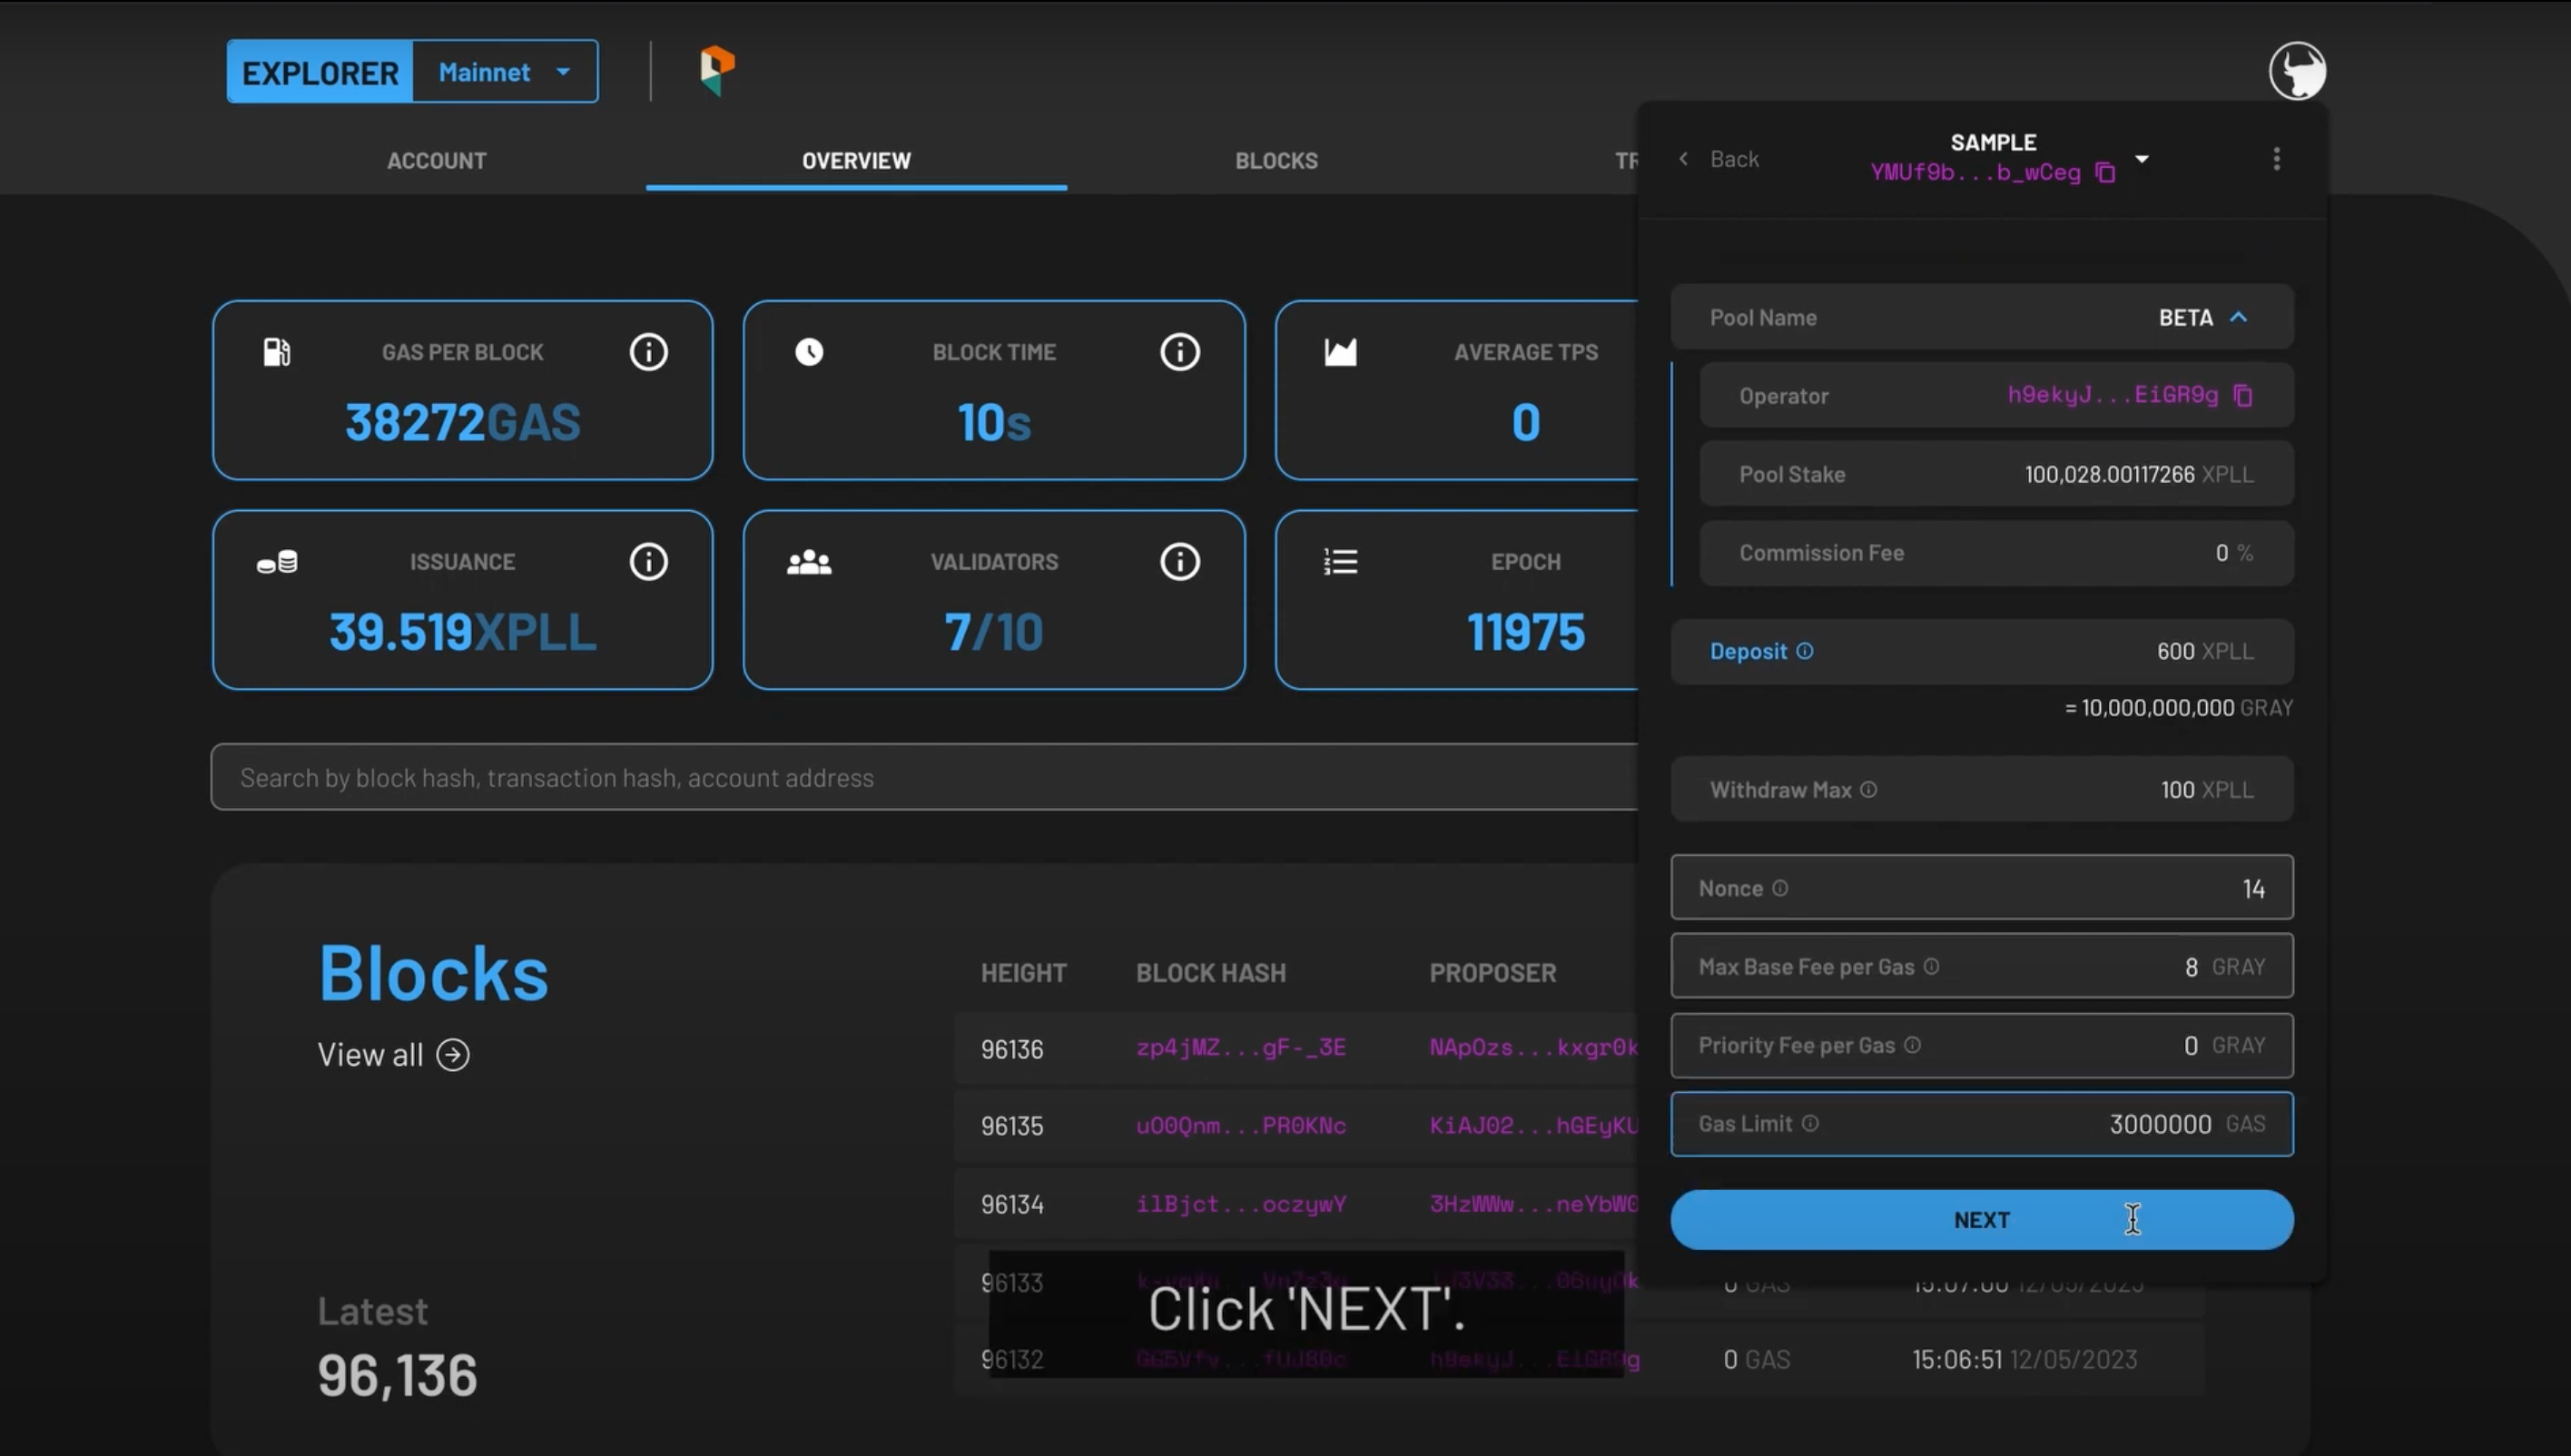
The following fields will appear:
- Nonce - This field will be automatically populated for you.
- Max Base Fee per Gas- This field will be automatically populated for you based on the current Base Fee per Gas of the network.
- Priority Fee per Gas- This determines the priority of your transaction, and the minimum fee is 0 XPLL.
- Gas Limit- This field will be automatically populated for you.
-
Once you are satisfied with the populated fields, press NEXT at the bottom.
- Preview the summary of the transaction, then press CONFIRM to continue, or CANCEL to make edits
- The status of the token deposit will be shown as PENDING. When it is validated by the network, a SUCCESS will be shown under its status tab.
- Your XPLL has now been successfully deposited with the validator. You can create more than one deposit by repeating the process under different validators.
- To start earning XPLL from staking, follow the instructions under Stake Your XPLL below.
Watch the video tutorial to learn how to deposit XPLL to the staking wallet here.
Staking Your XPLL
You can stake XPLL which you have deposited with validators to earn rewards.
Step 1: Navigate to your chosen validator
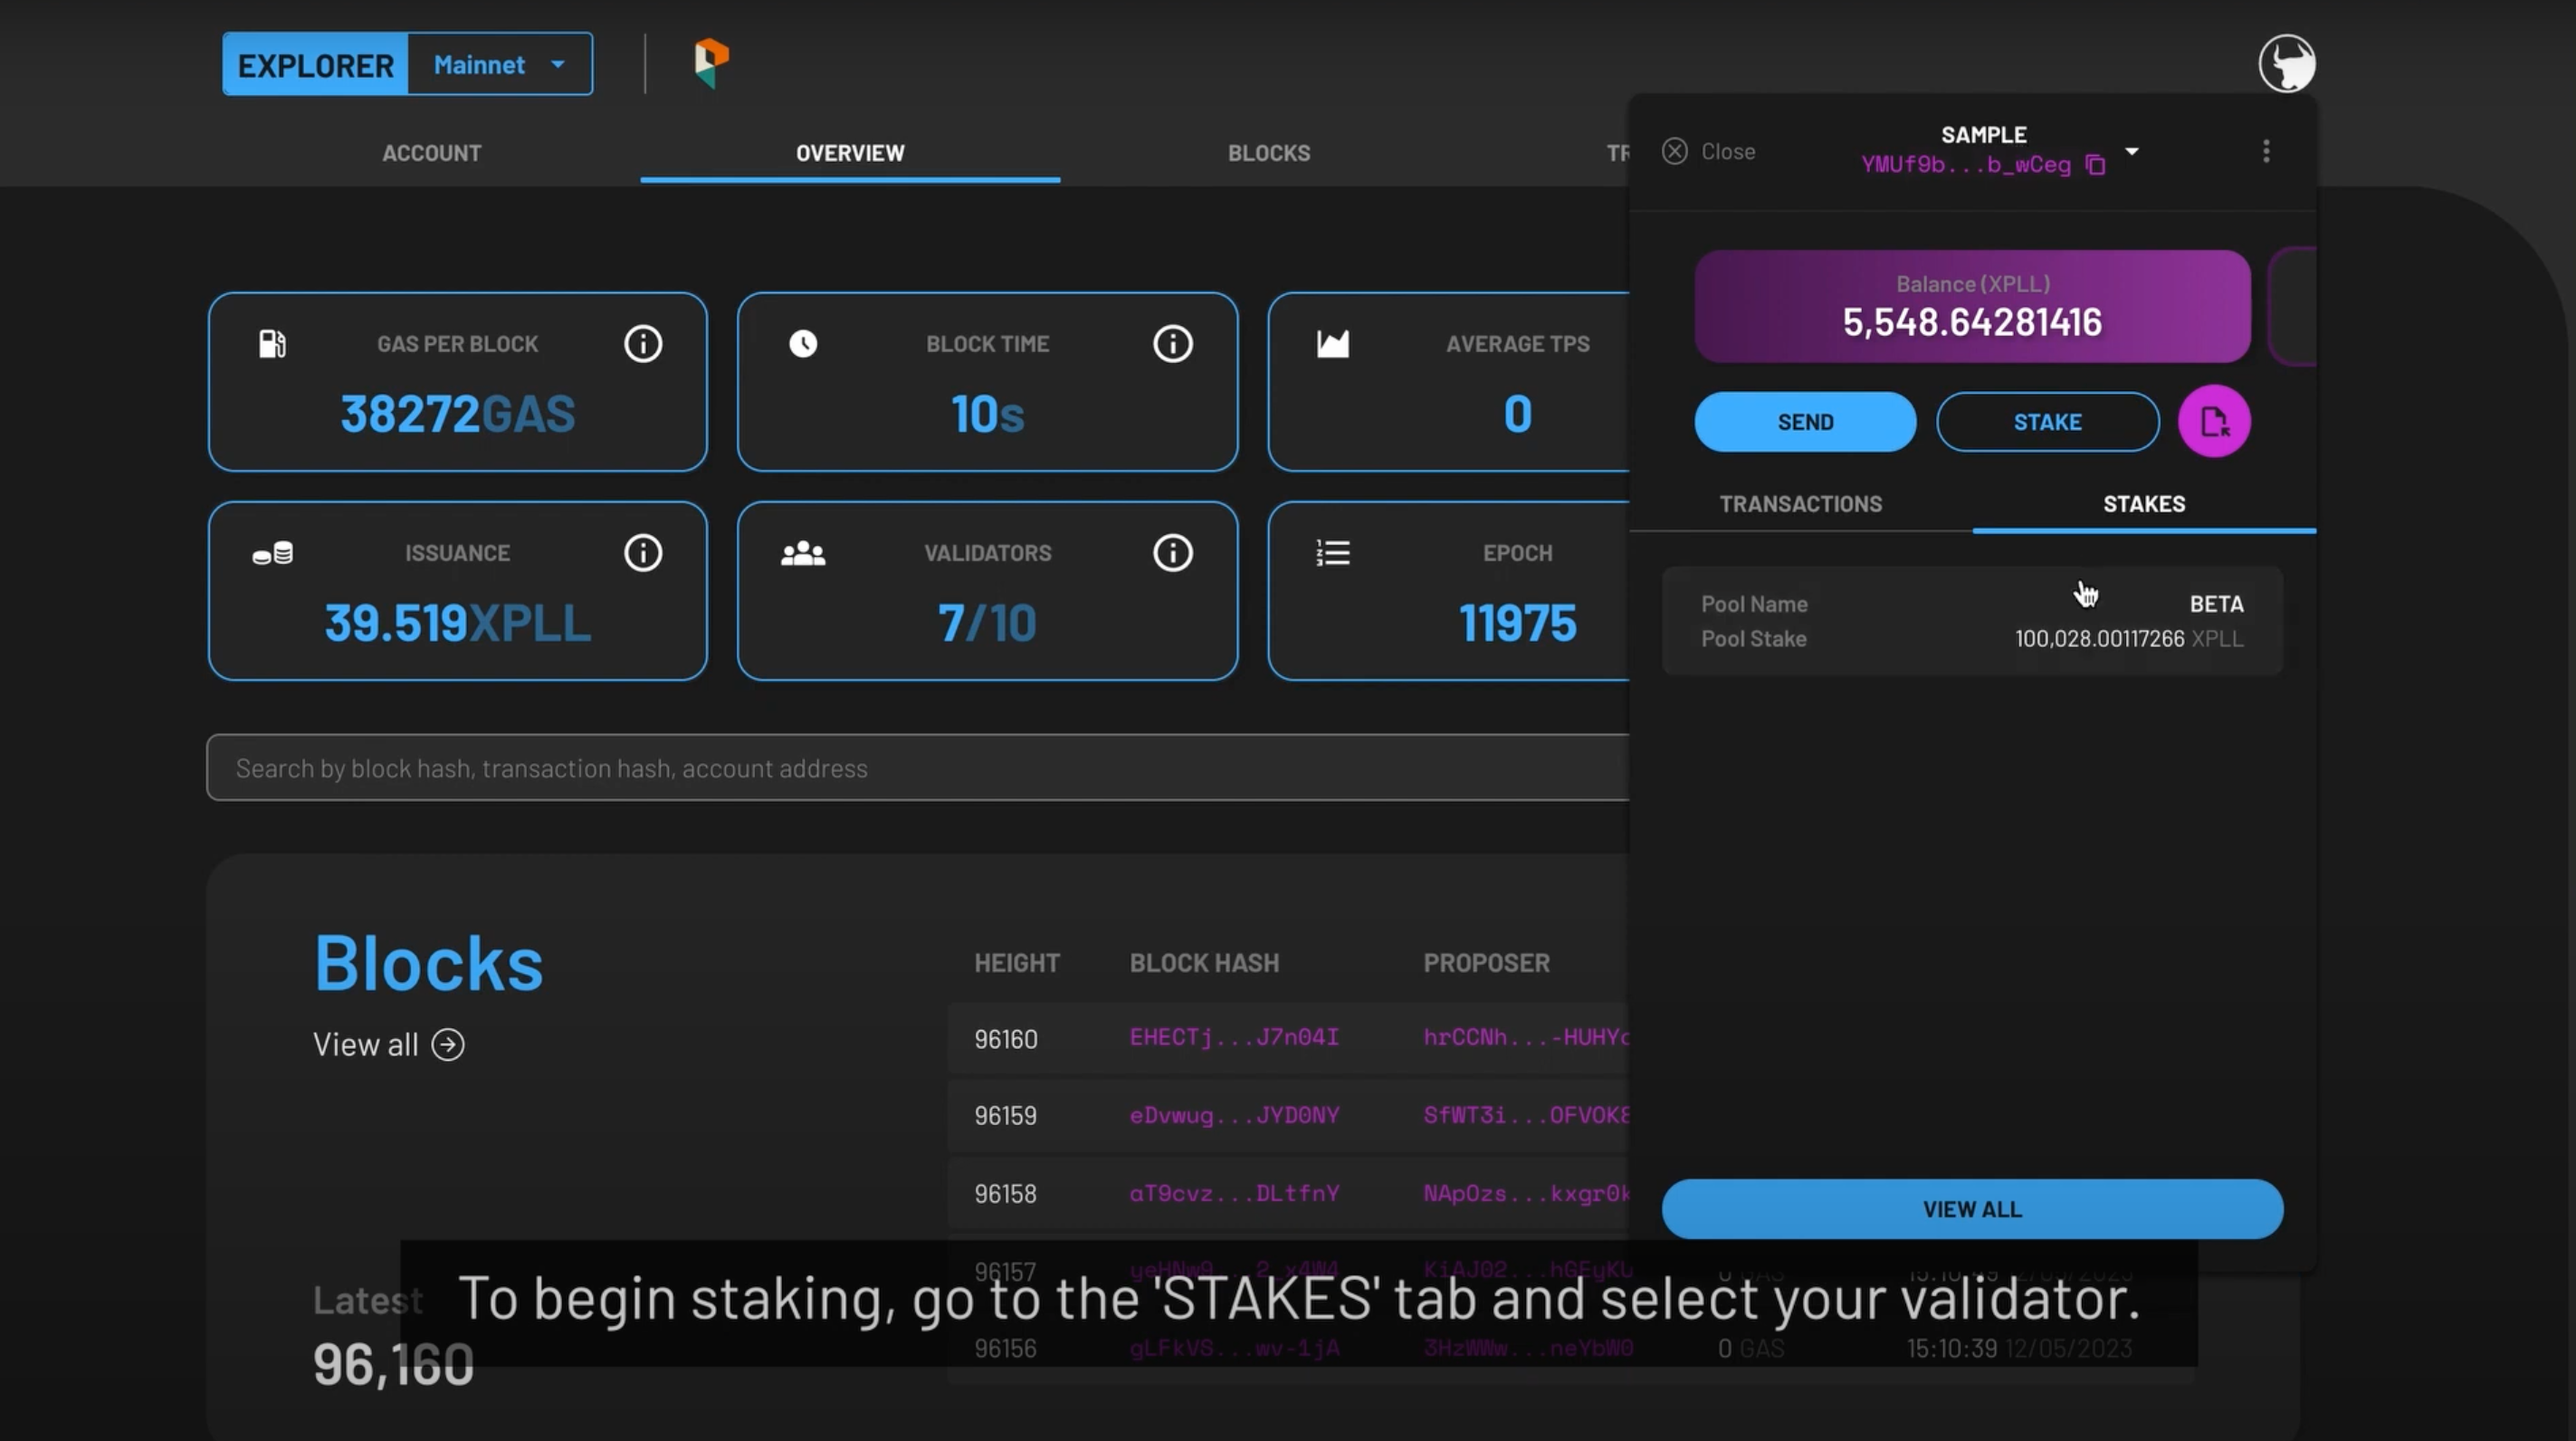
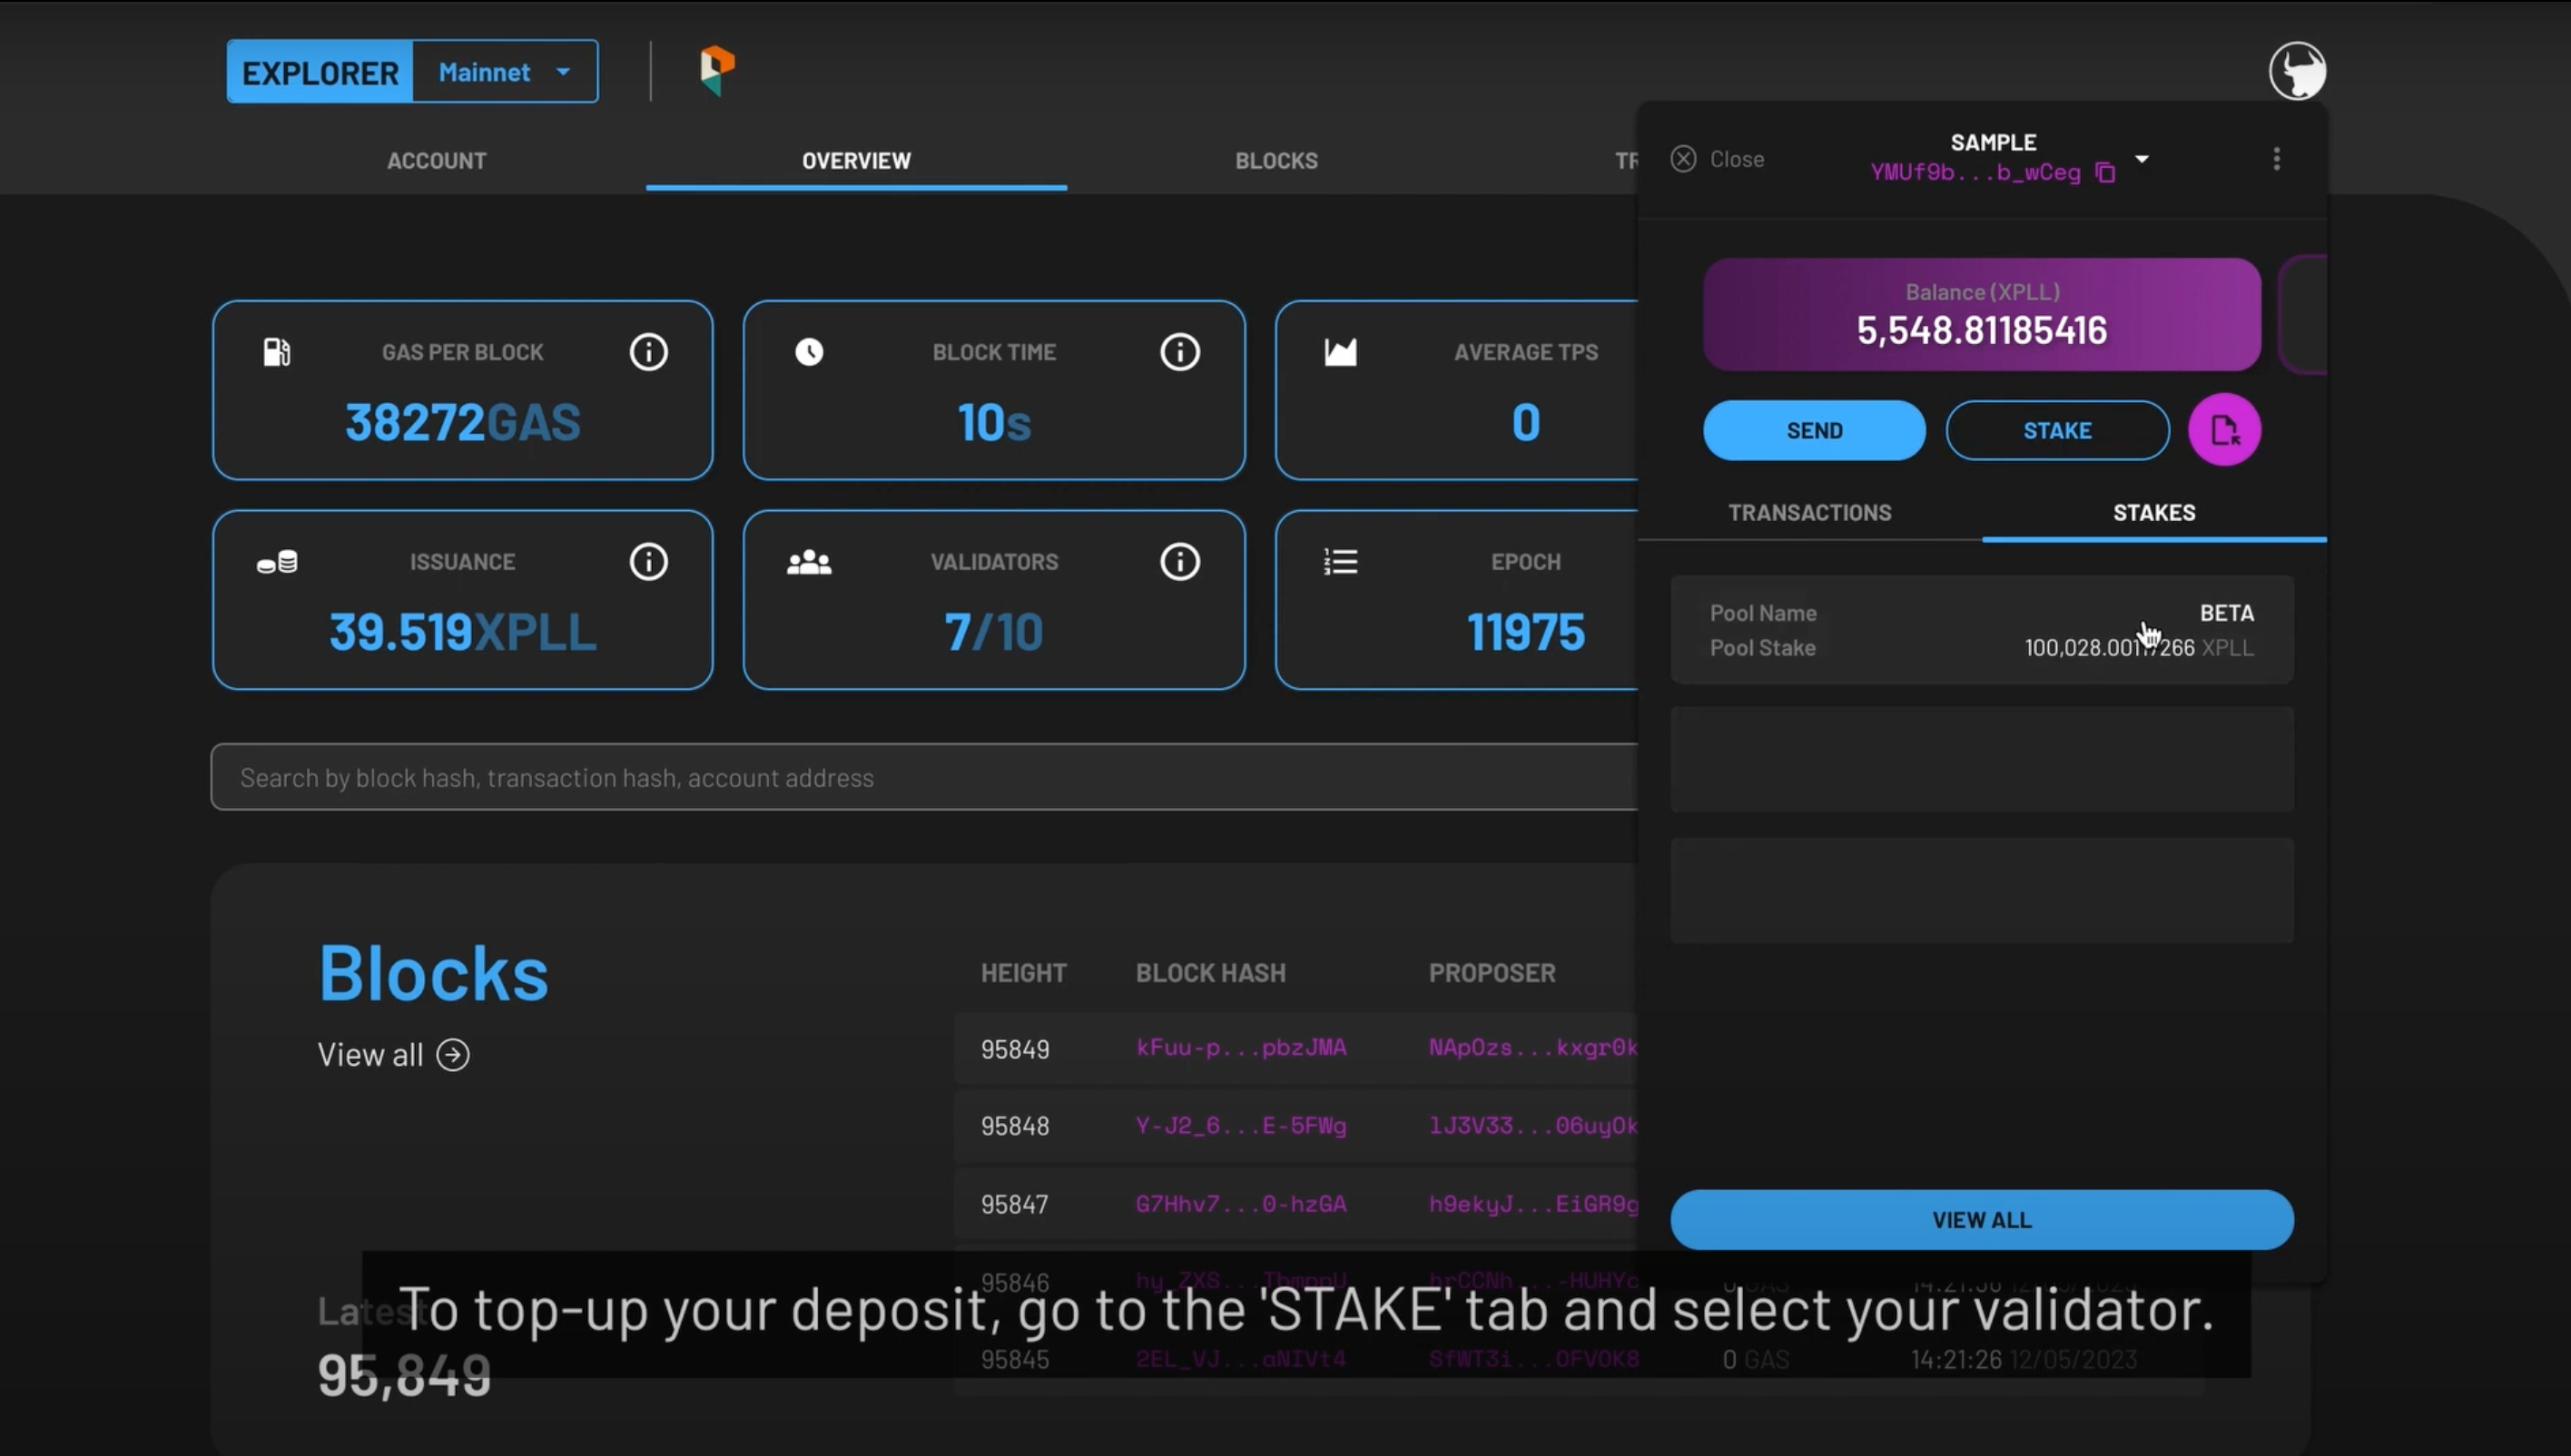
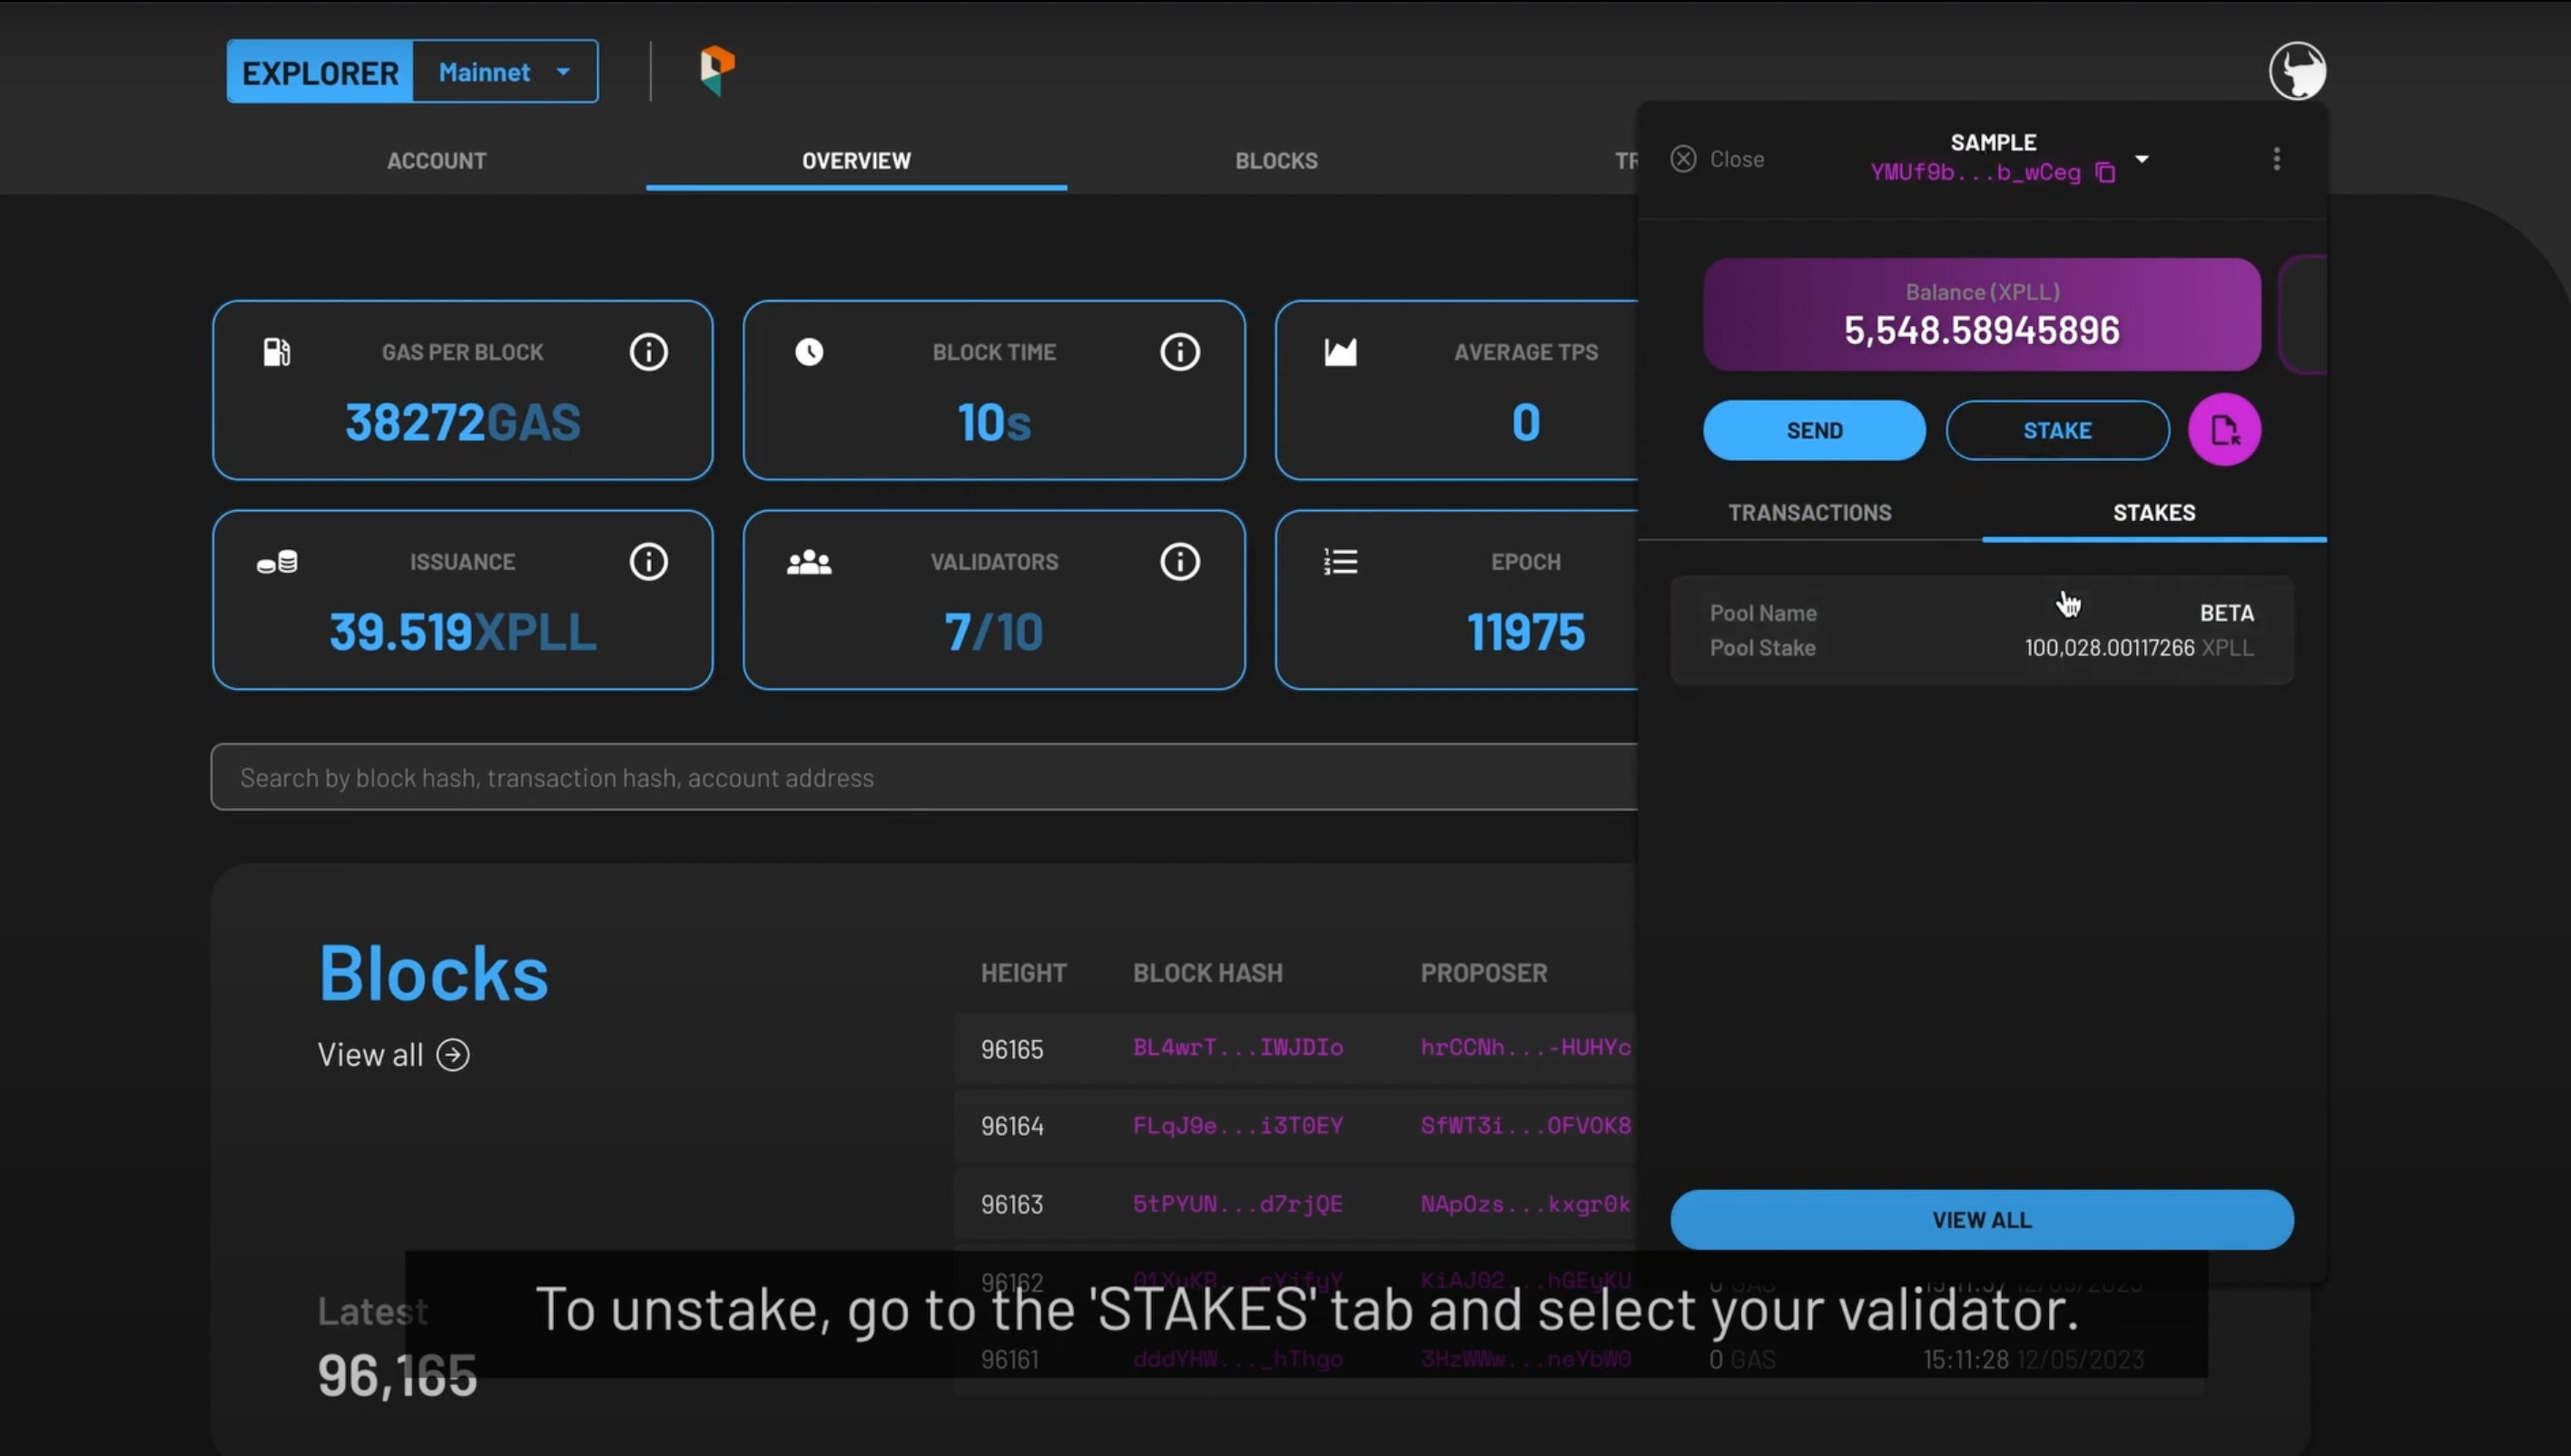
- On the main page, select the STAKES tab which is located beside the TRANSACTIONS tab. Then select the pool which you wish to top up XPLL.
-
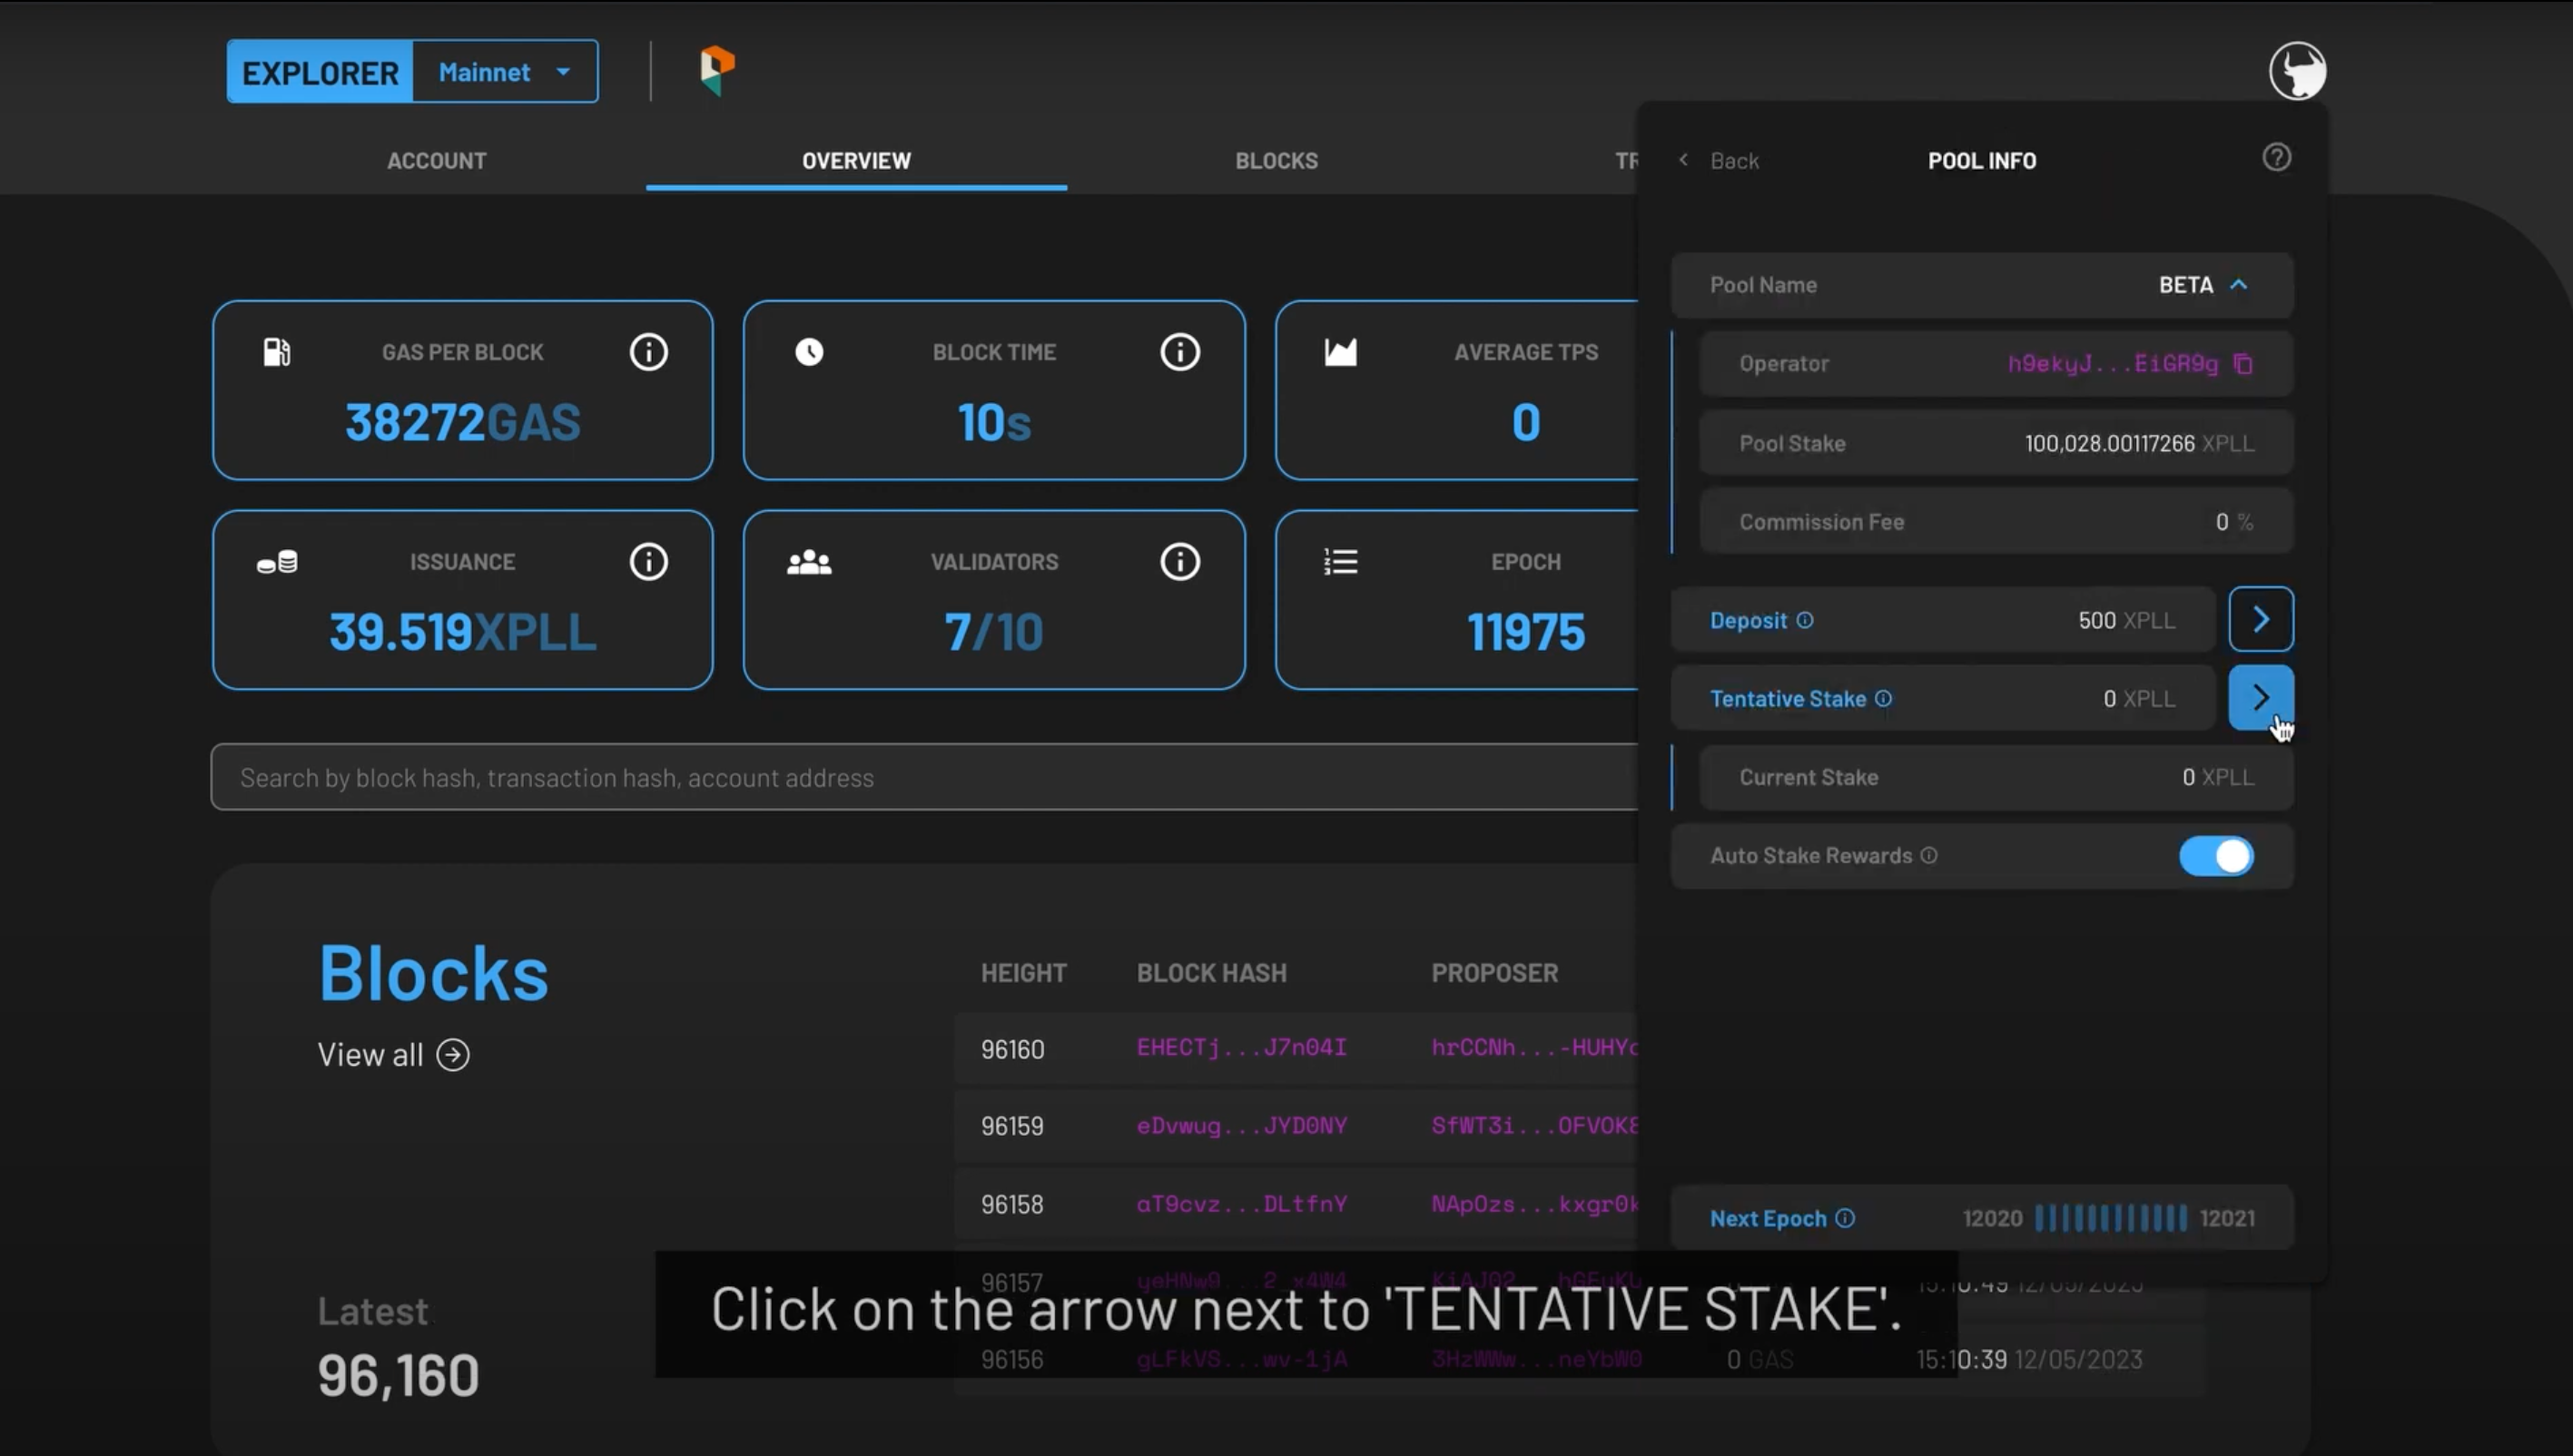
The pool information will be shown, along with fields relevant to you. This includes:
- DEPOSIT - the amount of XPLL you have deposited with the validator.
- TENTATIVE STAKE - the balance you have in the pool at this moment which will become part of the current stake in the future.
- CURRENT STAKE - the balance in the pool which has become part of the current validator set, and is now earning rewards.
- If you would like to auto-stake your rewards, toggle the AUTO STAKE REWARDS field on.
-
To stake XPLL, tap on the arrow beside the TENTATIVE STAKE field.
Step 2a: Stake With XPLL From Your Balance Account
-
The details of the validator pool will be displayed as shown:
-
Selecting the drop-down arrow under the POOL NAME:
- OPERATOR - the validator's address.
- POOL STAKE - the amount of XPLL staked with the validator.
- COMMISSION FEE - the percentage of your rewards the validator will take as a commission fee.
-
Your deposited XPLL will be shown in the DEPOSIT field.
-
-
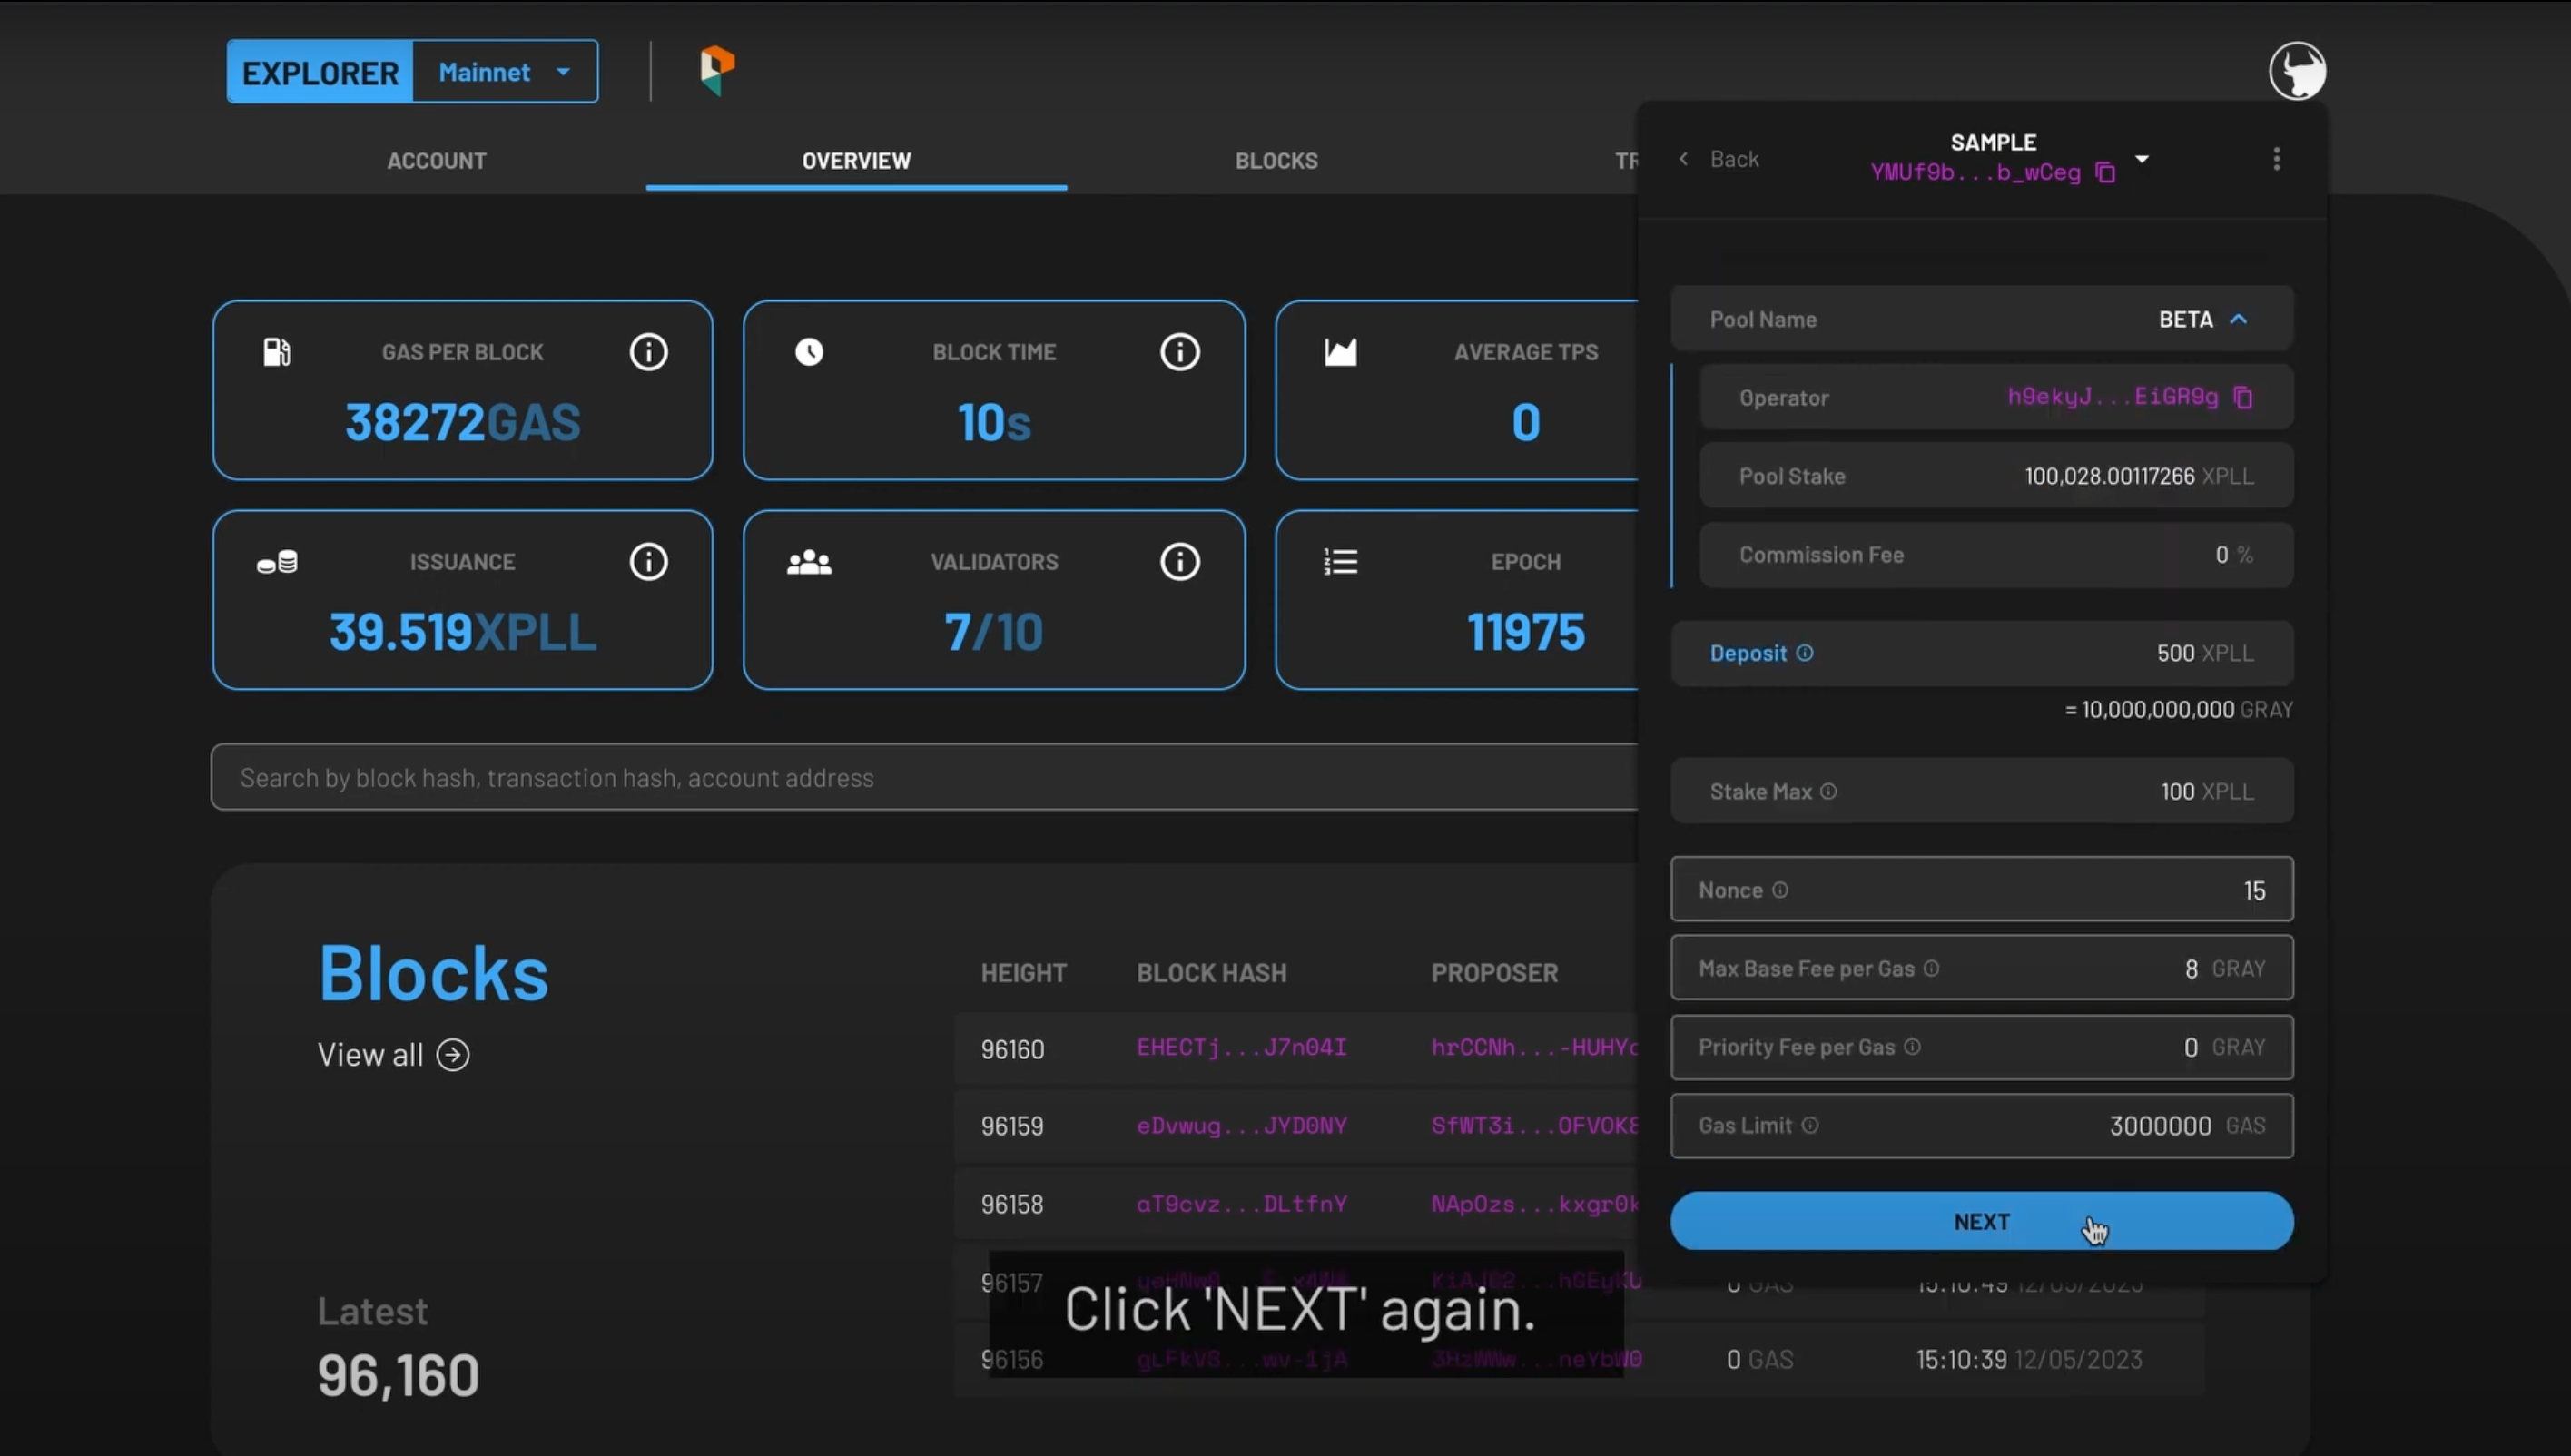
Create your initial stake with the validator by entering the amount of XPLL you wish to stake in the STAKE MAX field. The number cannot exceed the amount of XPLL you have deposited.
- If you have an existing stake with the validator, you have the option to stake more XPLL or unstake them with the STAKE and UNSTAKE buttons respectively.
- To add more staked XPLL, select the STAKE button. Enter the amount of XPLL you wish to stake in the STAKE MAX field. The number cannot exceed the amount of XPLL you have deposited.
- Press NEXT once you are comfortable with the amount.
Step 2b: Stake With XPLL From Your Lock-Up Contract
-
The details of the validator pool will be displayed as shown:
- LOCK-UP CONTRACT (XPLL)/LOCKED - your tokens that are still vested.
-
Selecting the drop-down arrow under the POOL NAME:
- OPERATOR - the validator's address.
- POOL STAKE - the amount of XPLL staked with the validator.
- COMMISSION FEE - the percentage of your rewards the validator will take as a commission fee.
-
Your deposited XPLL will be shown in the DEPOSIT field.
-
Create your initial stake with the validator. The amount is automatically filled for you in the STAKE MAX field.
- If you have an existing stake with the validator, you have the option to stake more XPLL or unstake them with the STAKE and UNSTAKE buttons respectively.
- To add more staked XPLL, select the STAKE button. If you are staking with the validator through a lock-up contract, the amount is automatically filled for you in the STAKE MAX field.
- Press NEXT to continue.
Step 3: Confirm Your Transaction
-
The following fields will appear:
- Nonce - This field will be automatically populated for you.
- Max Base Fee per Gas- This field will be automatically populated for you based on the current Base Fee per Gas of the network.
- Priority Fee per Gas- This determines the priority of your transaction, and the minimum fee is 0 XPLL.
- Gas Limit- This field will be automatically populated for you.
-
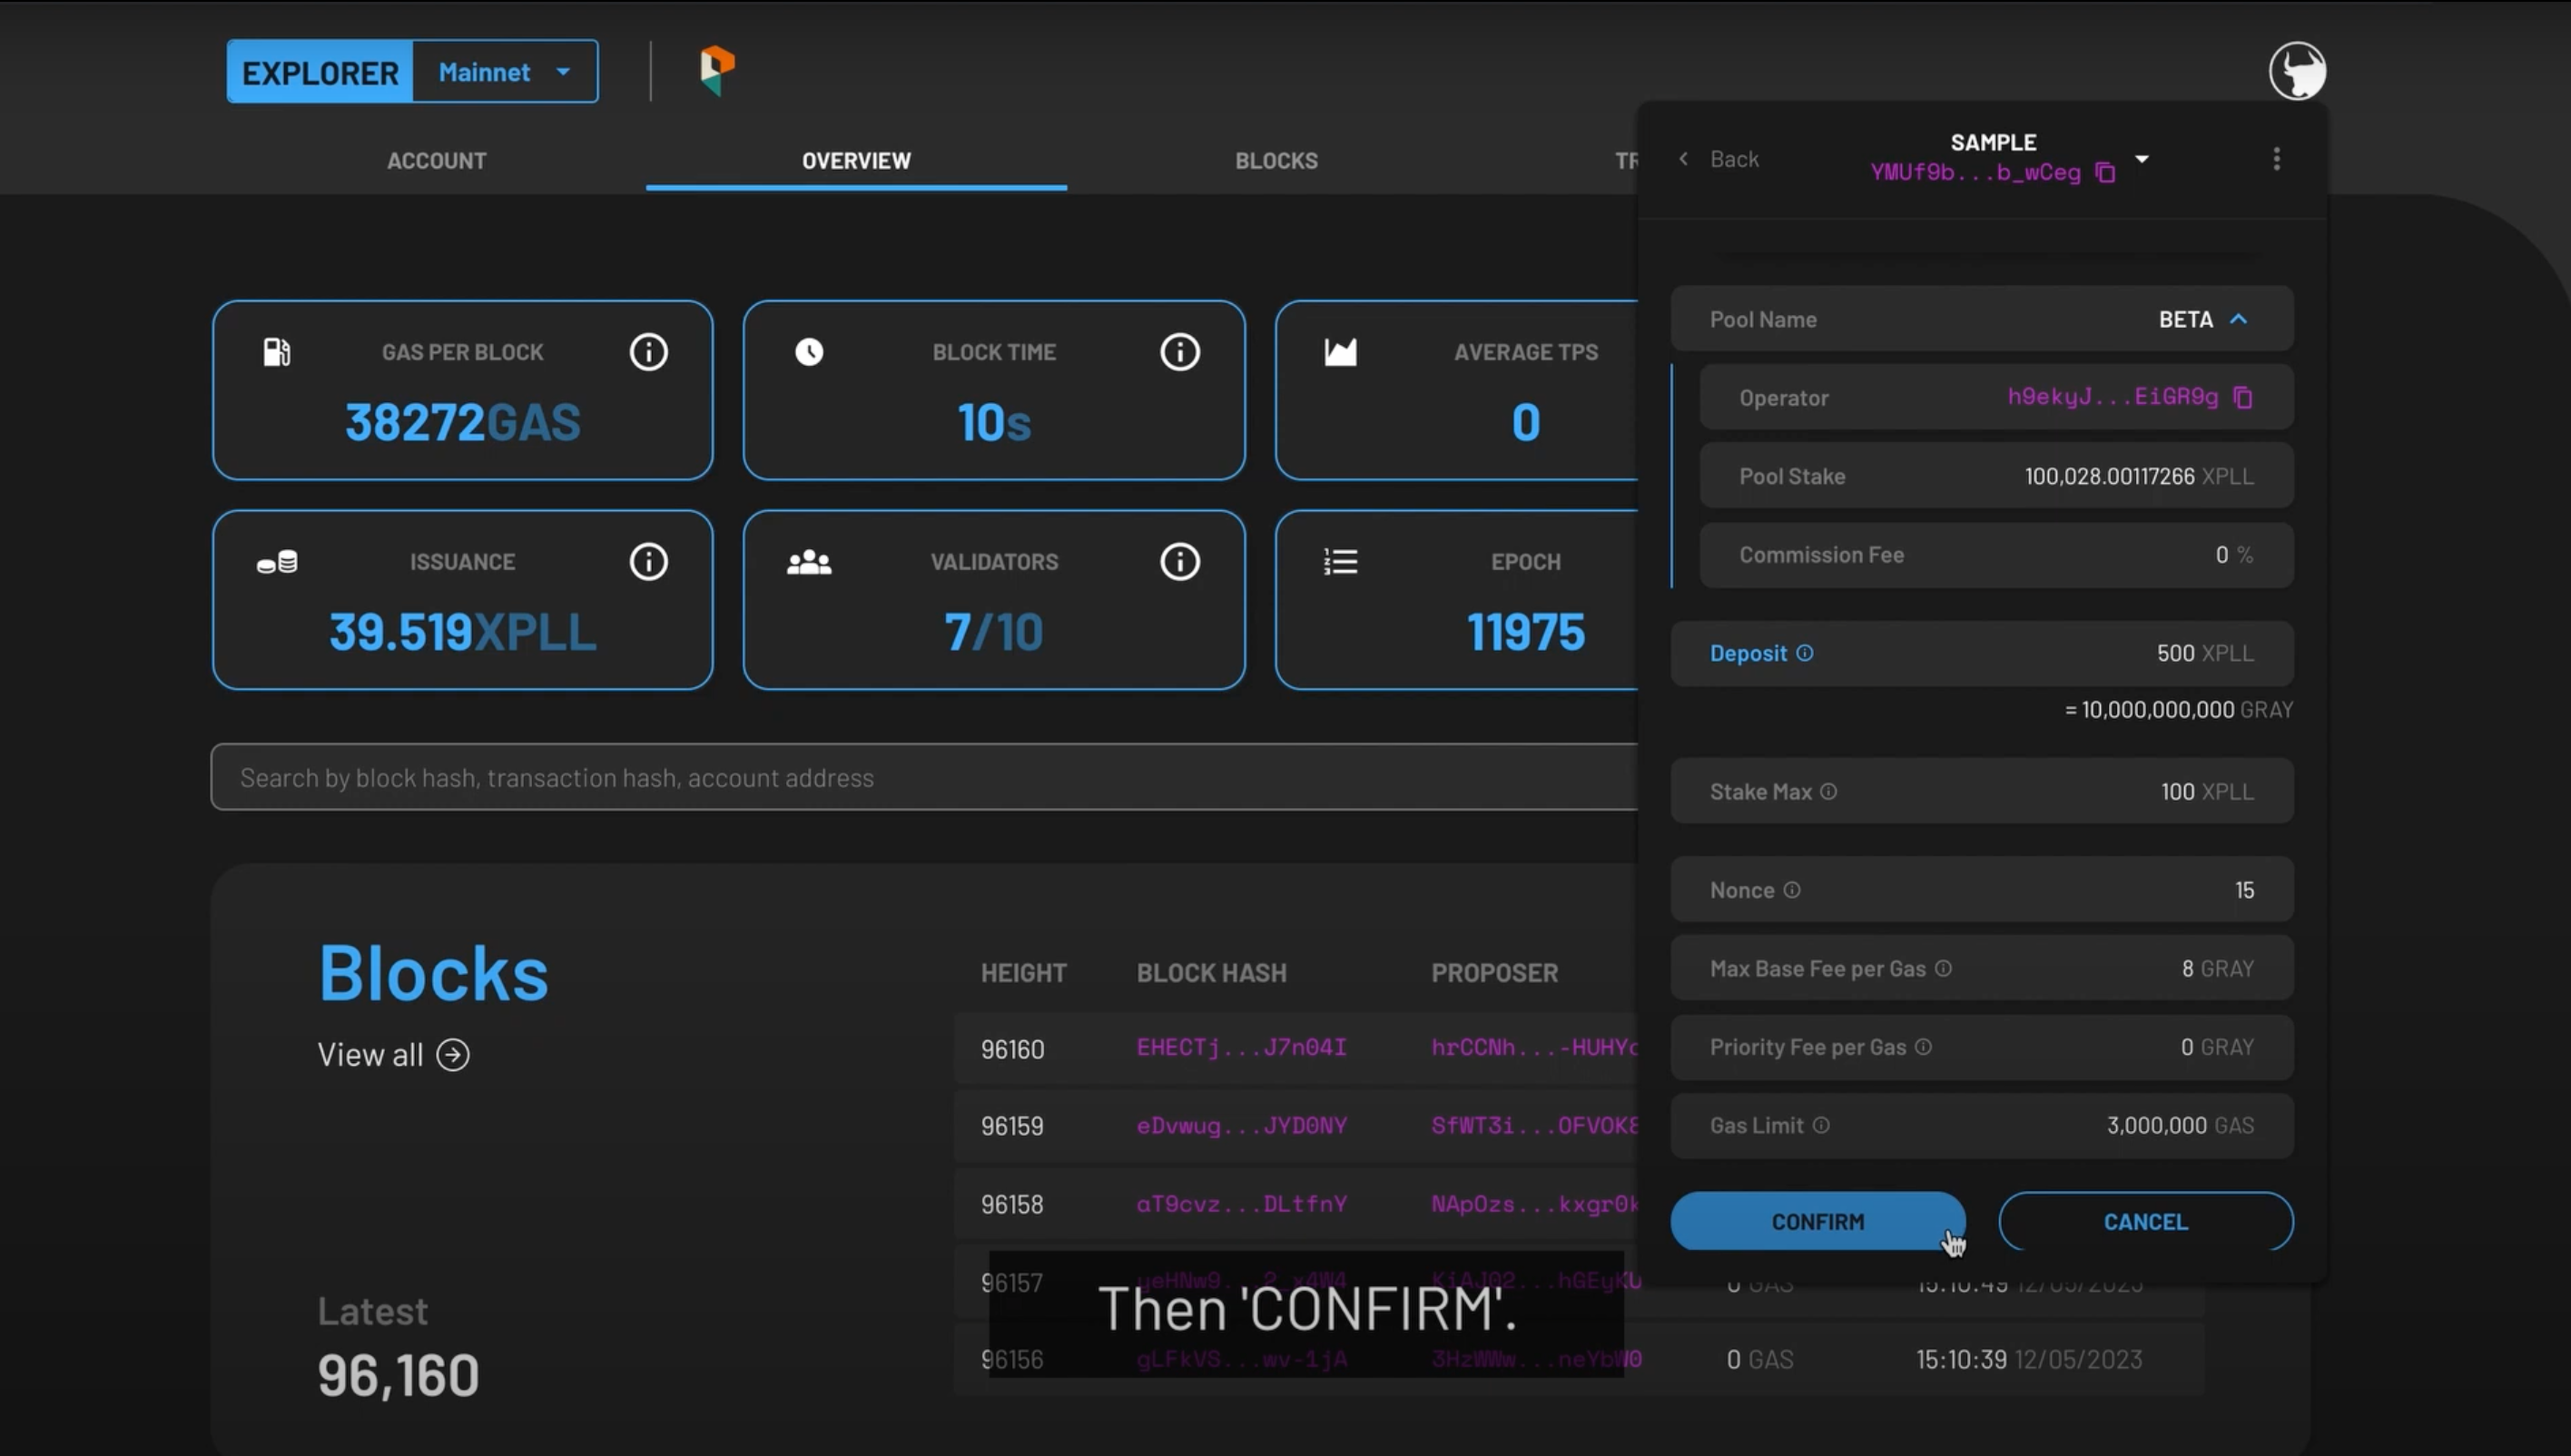
Once you are satisfied with the populated fields, press NEXT at the bottom.
- Preview the summary of the transaction, then press CONFIRM to continue, or CANCEL to make edits.
- The status of the token deposit will be shown as PENDING. When it is validated by the network, a SUCCESS will be shown under its status tab. !!! note Due to the network state when your transaction gets included, the actual amount may differ slightly from your desired amount.
- The staking will take approximately two epochs to be confirmed.
Watch the video tutorial on how to stake your XPLL here.
Top-Up Your Stake
Step 1: Navigate to your chosen validator
- On the main page, select the STAKES tab which is located beside the TRANSACTIONS tab. Then select the pool which you wish to top up XPLL.
-
The pool information will be shown, along with fields relevant to you. This includes:
- DEPOSIT - the amount of XPLL you have deposited with the validator.
- TENTATIVE STAKE - the balance you have in the pool at this moment which will become part of the current stake in the future.
- CURRENT STAKE - the balance in the pool which has become part of the current validator set, and is now earning rewards.
- If you would like to auto-stake your rewards, toggle the AUTO STAKE REWARDS field on.
 3. To top up XPLL, tap on the arrow beside the DEPOSIT field
Step 2: Top-up Your Stake Through Your Balance Account
-
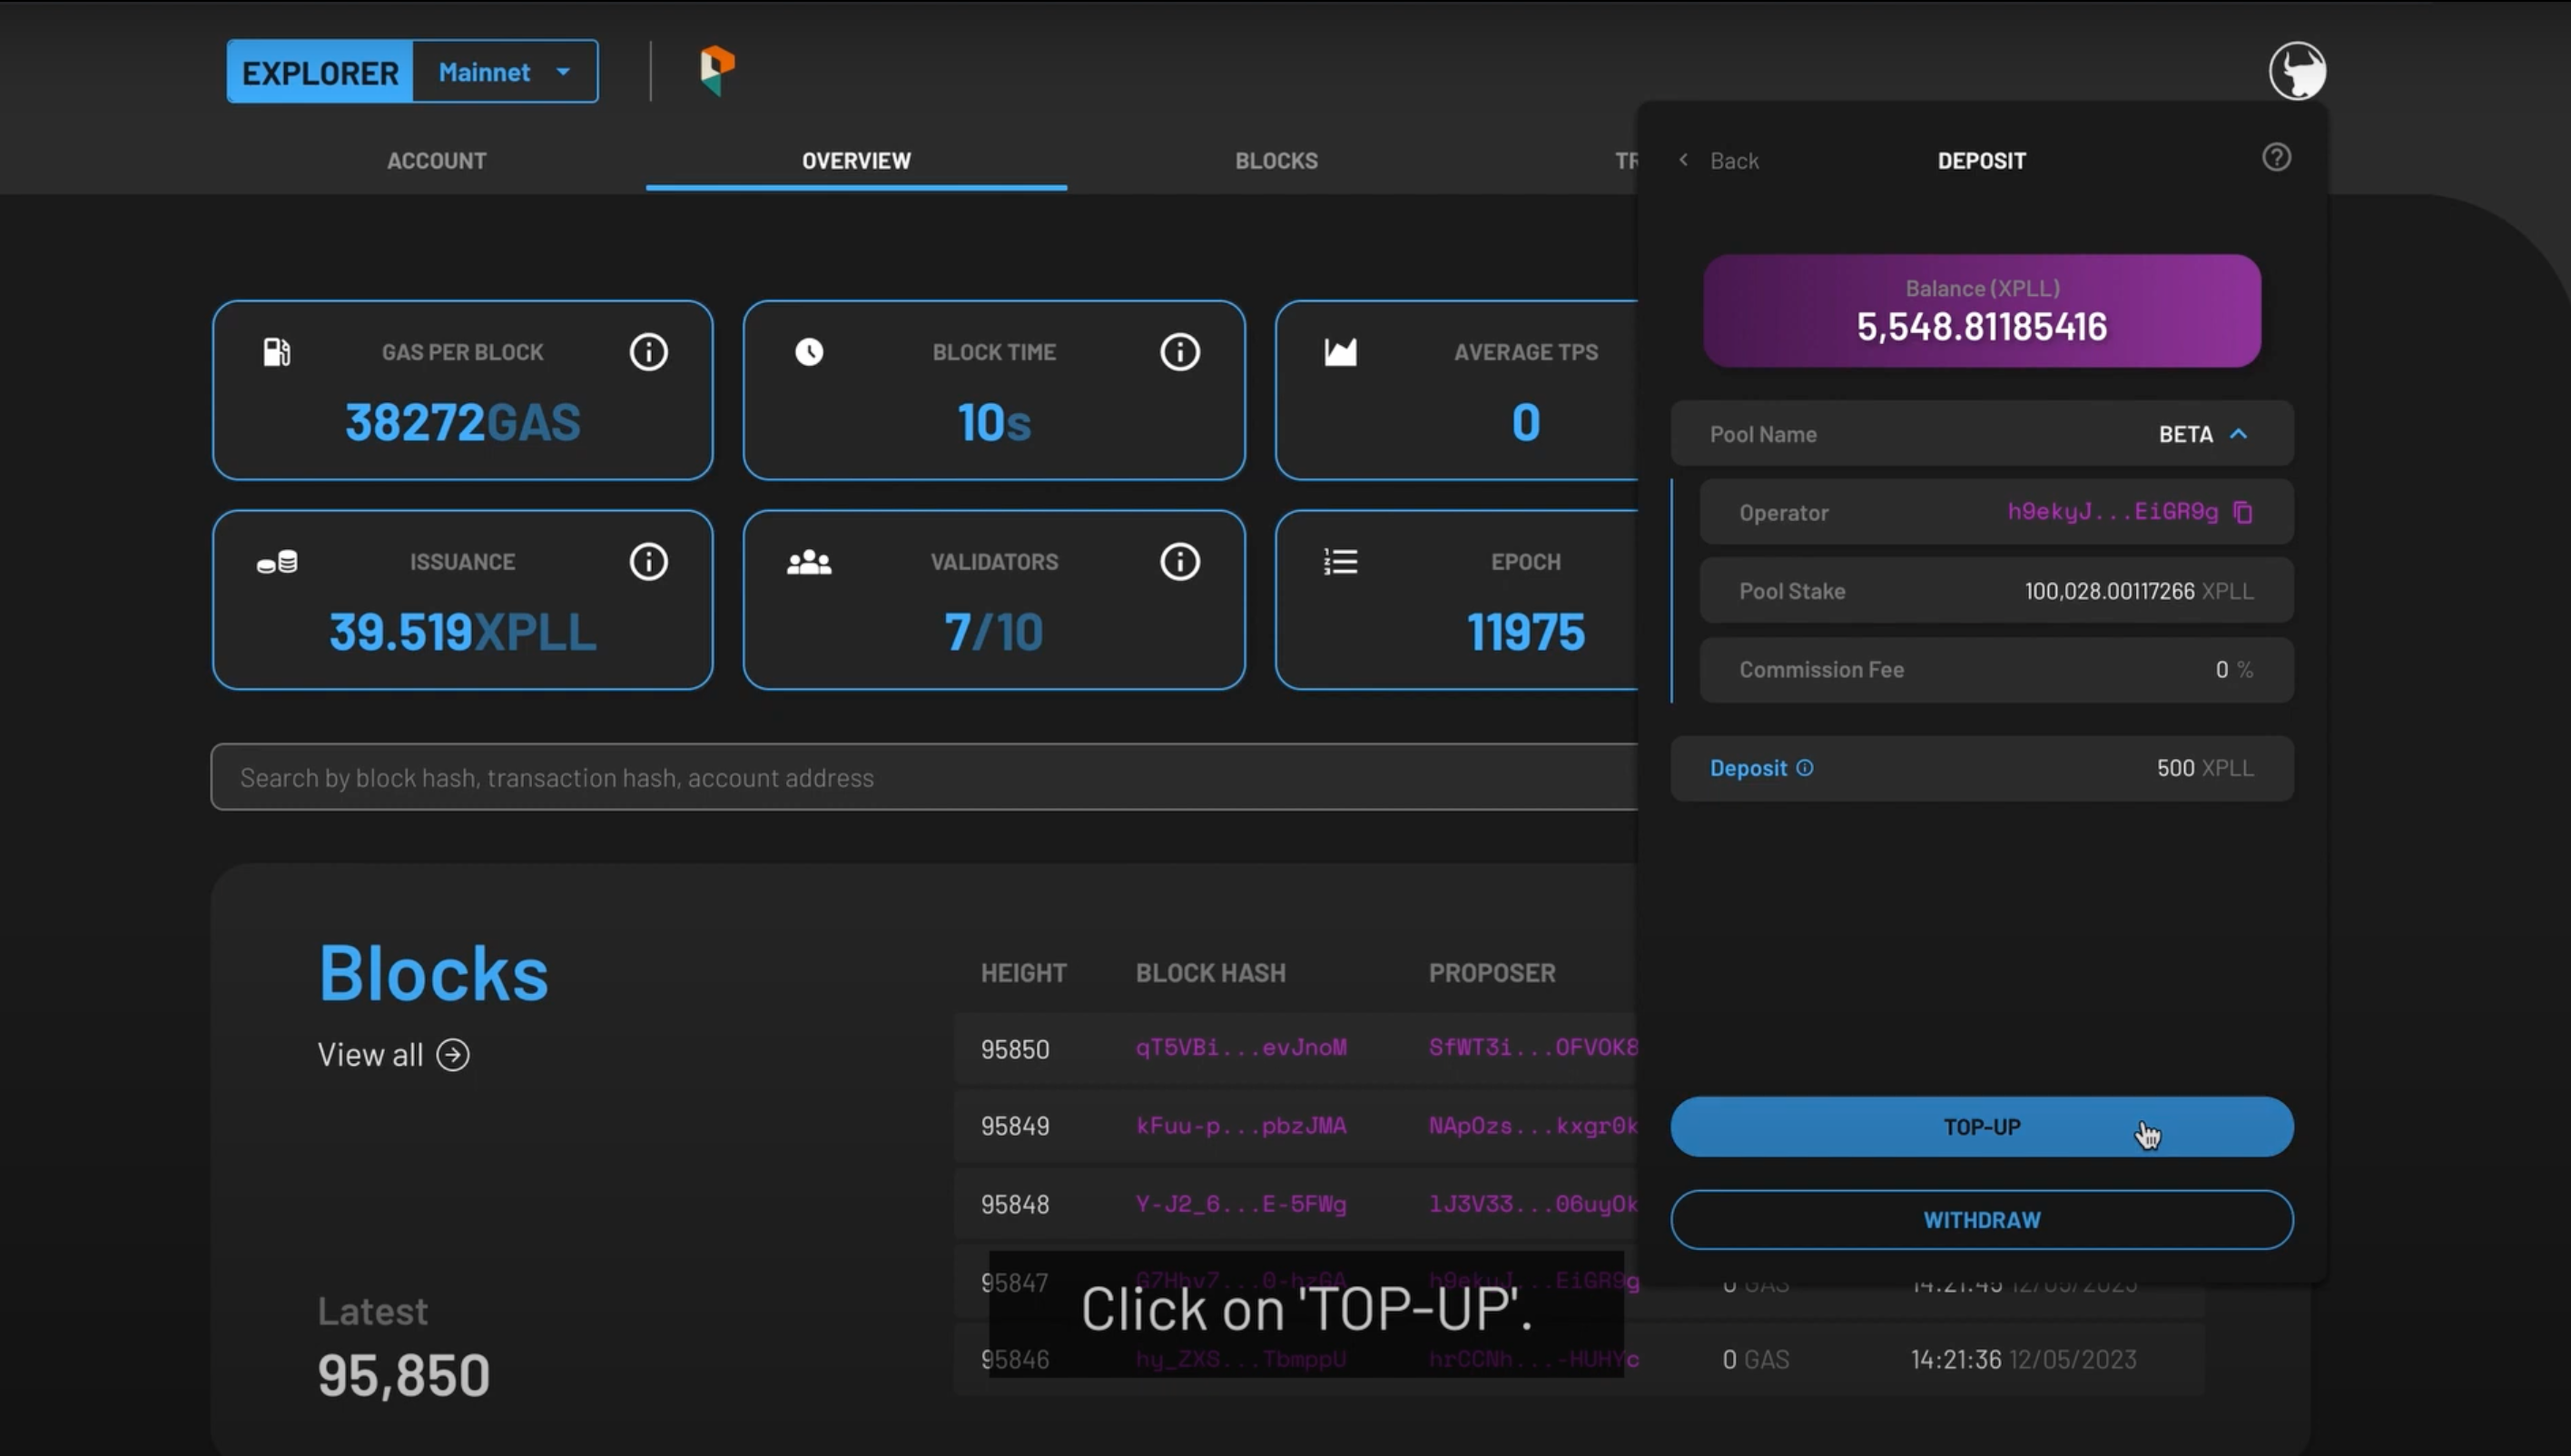
Once you have selected your desired validator, the details of the validator pool will be displayed as shown:
-
Selecting the drop-down arrow under the POOL NAME:
- OPERATOR - the validator's address.
- POOL STAKE - the amount of XPLL staked with the validator.
- COMMISSION FEE - the percentage of your rewards the validator will take as a commission fee.
-
Your deposited XPLL will be shown in the DEPOSIT field.
-
-
Select TOP-UP to deposit more XPLL to your validator deposit.
- The TOP-UP field will appear, and you can enter the amount you wish to top-up. The amount cannot exceed your account balance.
- Click NEXT to continue.
Step 3: Confirm Your Transaction

-
The following fields will appear:
- Nonce - This field will be automatically populated for you.
- Max Base Fee per Gas- This field will be automatically populated for you based on the current Base Fee per Gas of the network.
- Priority Fee per Gas- This determines the priority of your transaction, and the minimum fee is 0 XPLL.
- Gas Limit- This field will be automatically populated for you.
-
Once you are satisfied with the populated fields, press NEXT at the bottom.
- Preview the summary of the transaction, then press CONFIRM to continue, or CANCEL to make edits.
- The status of the token deposit top up will be shown as PENDING. When it is validated by the network, a SUCCESS will be shown under its status tab.
Watch the video tutorial on how to top up your XPLL here.
Withdrawing Your Stakes
Step 1: Navigate to your chosen validator
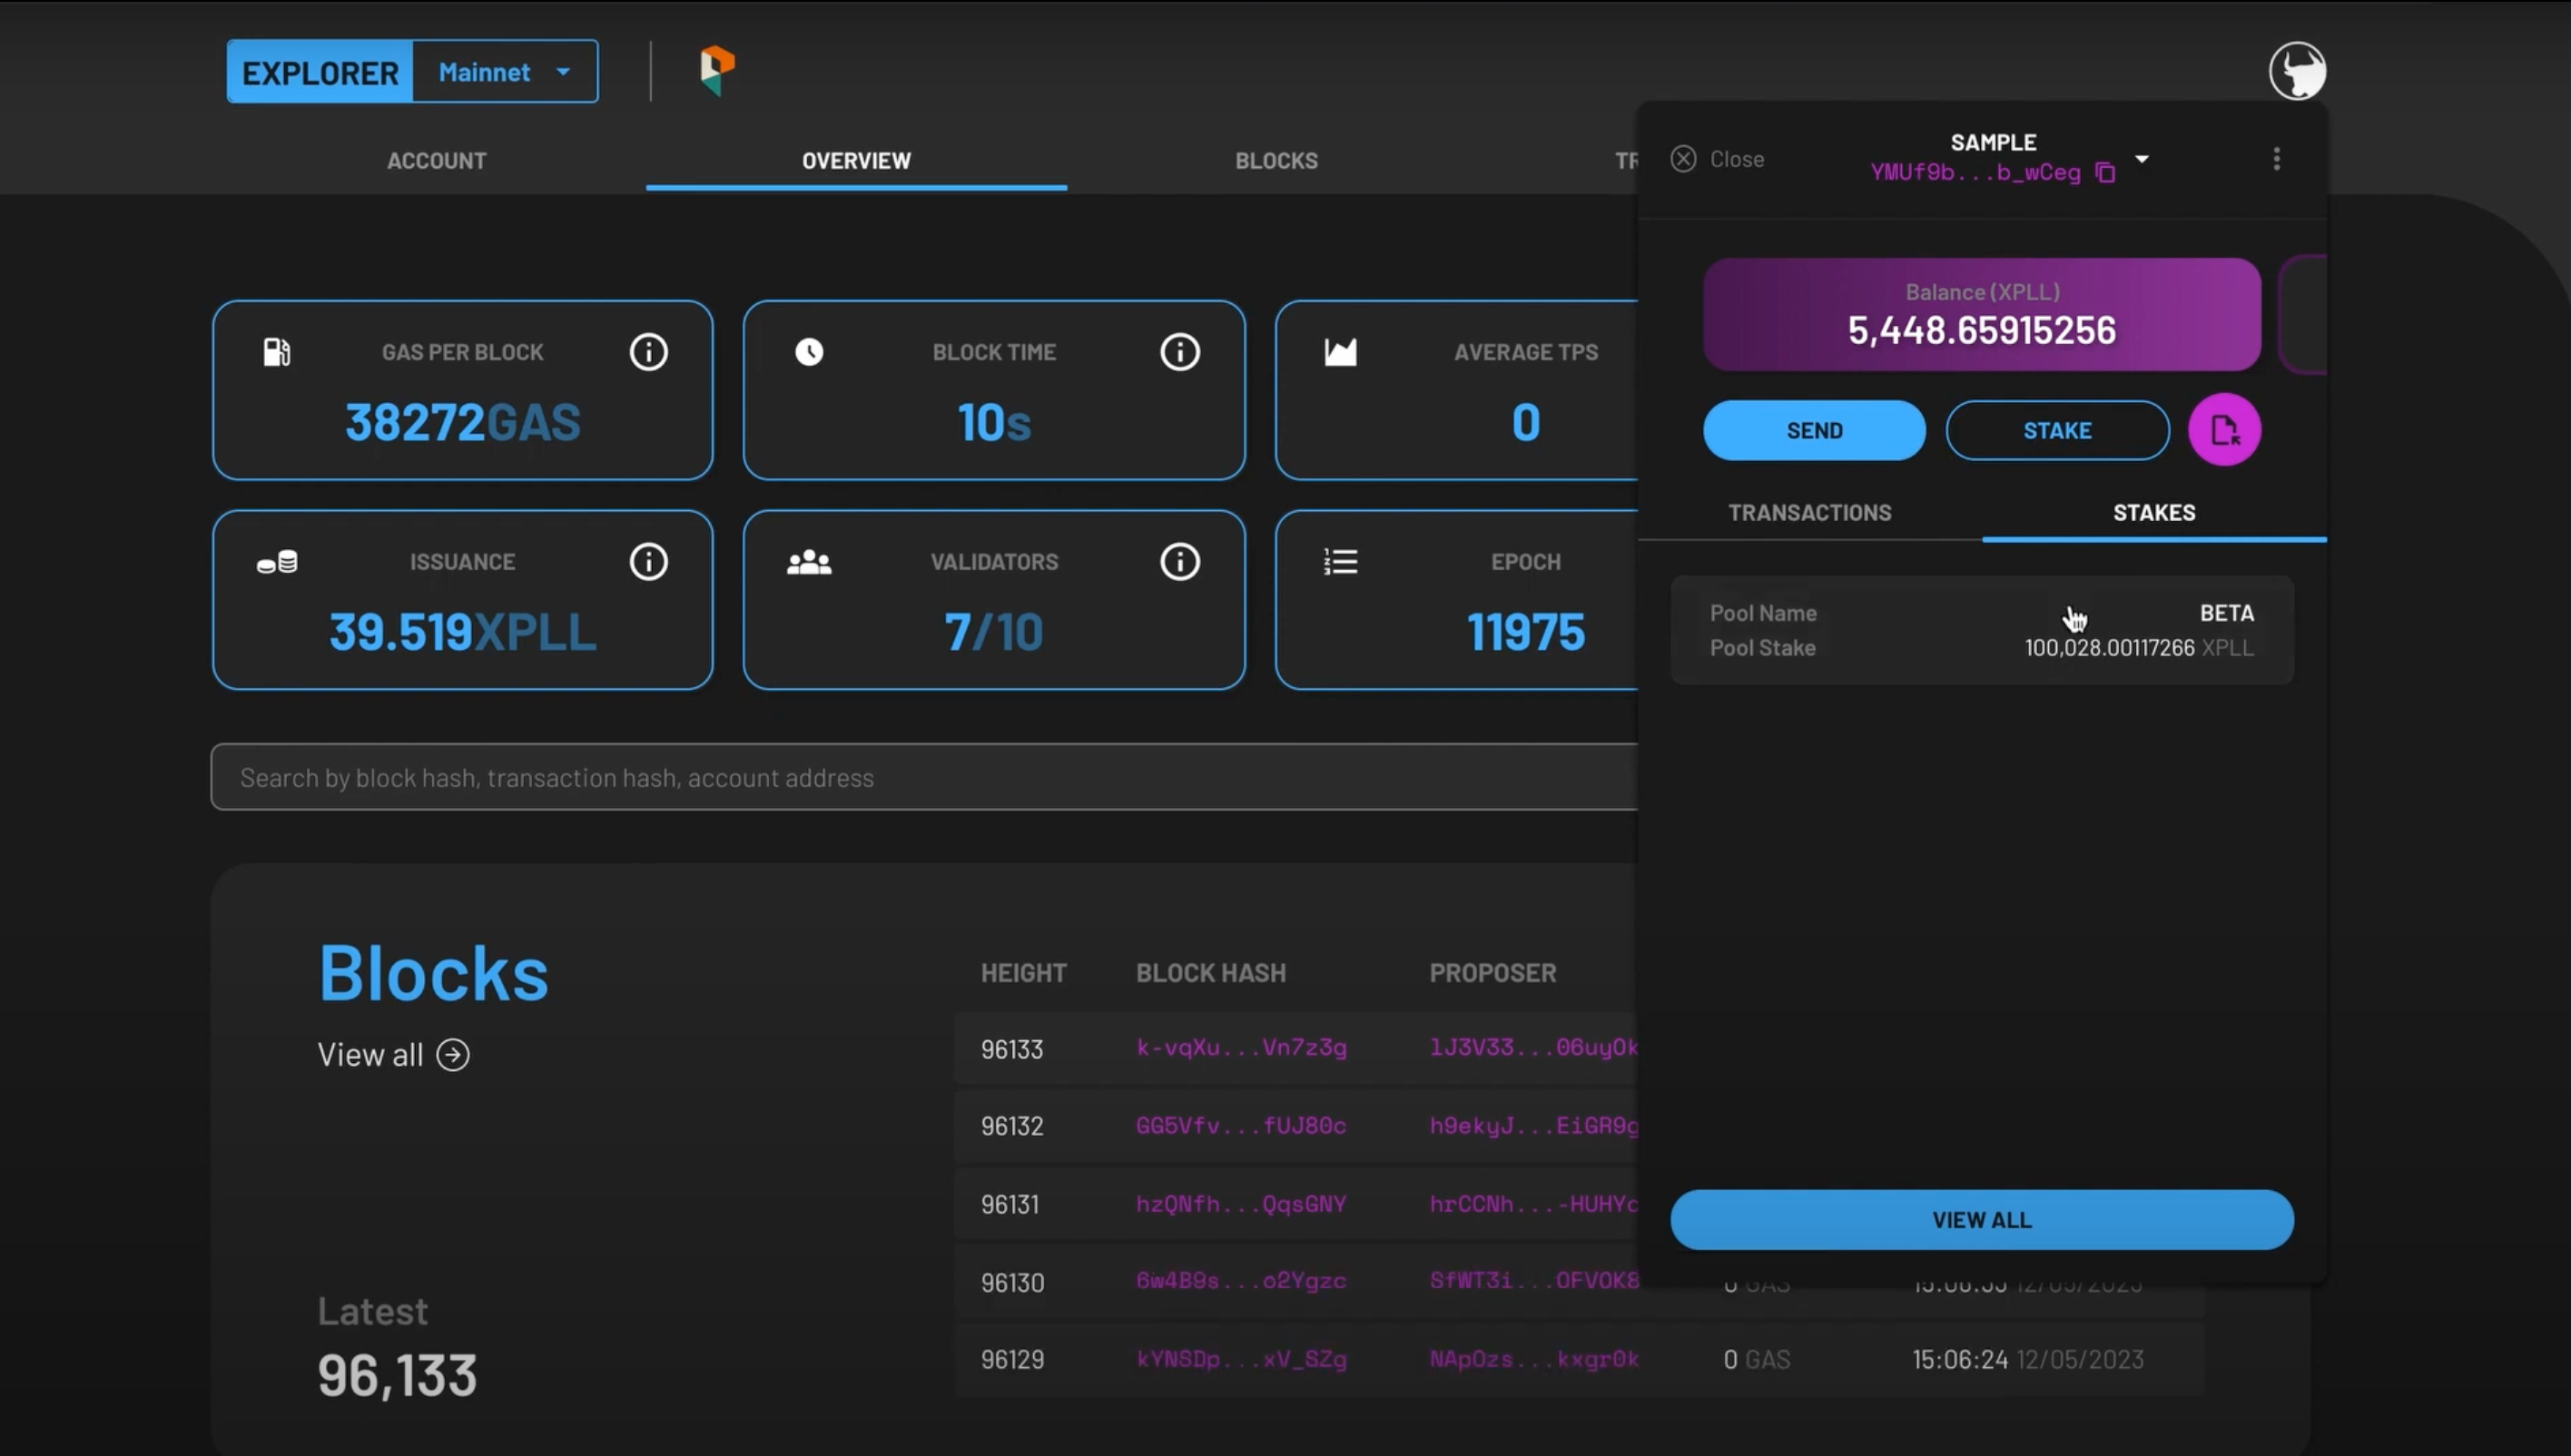
- On the main page, select the STAKES tab which is located beside the TRANSACTIONS tab. Then select the pool which you wish to withdraw XPLL.
-
The pool information will be shown, along with fields relevant to you. This includes:
- DEPOSIT - the amount of XPLL you have deposited with the validator.
- TENTATIVE STAKE - the balance you have in the pool at this moment which will become part of the current stake in the future.
- CURRENT STAKE - the balance in the pool which has become part of the current validator set, and is now earning rewards.
- If you would like to auto-stake your rewards, toggle the AUTO STAKE REWARDS field on.

-
To withdraw XPLL, tap on the arrow beside the DEPOSIT field.
Step 2a: Withdraw Stakes To Your Balance Account
-
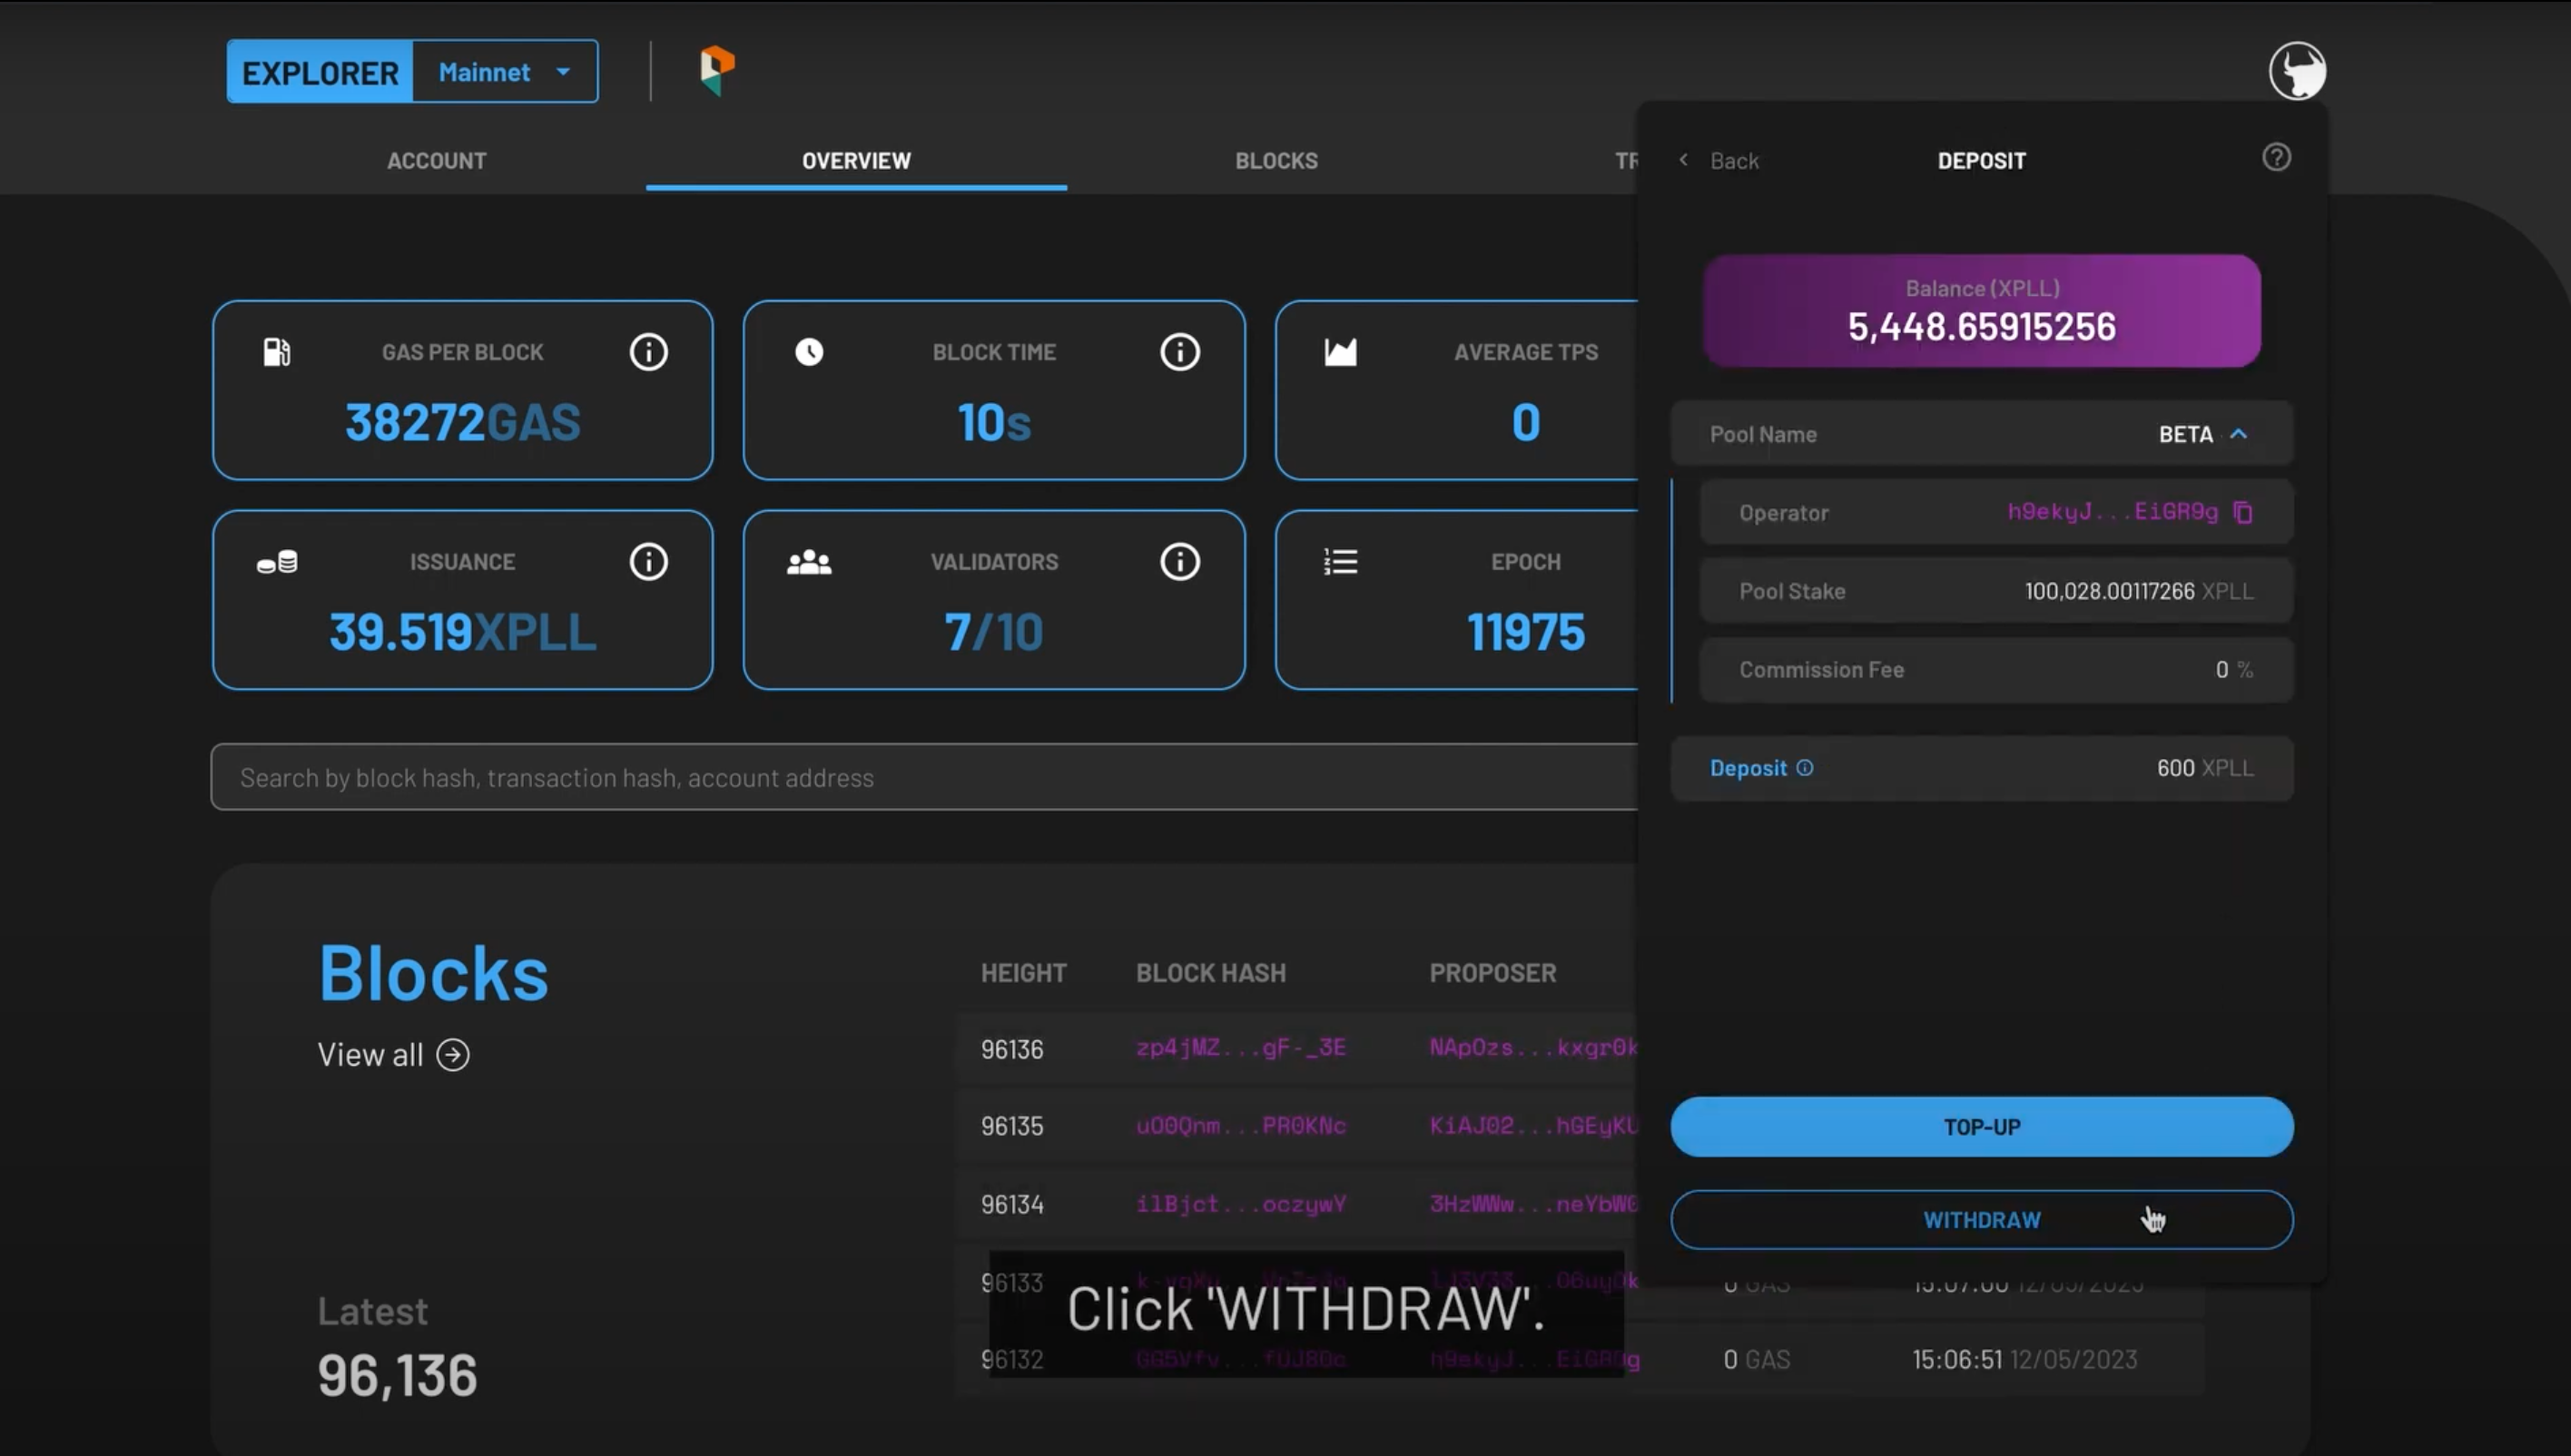
The details of the validator pool will be displayed as shown:
-
Selecting the drop-down arrow under the POOL NAME:
- OPERATOR - the validator's address.
- POOL STAKE - the amount of XPLL staked with the validator.
- COMMISSION FEE - the percentage of your rewards the validator will take as a commission fee.
-
Your deposited XPLL will be shown in the DEPOSIT field.
-
-
Select WITHDRAW to withdraw XPLL from your validator deposit.
- The WITHDRAW MAX field will appear, and you can enter the amount you wish to withdraw. The amount cannot exceed the current amount deposited with the validator.
Step 2b: Withdraw Stakes Through Your Lock-Up Contract
-
The details of the validator pool will be displayed as shown:
- LOCK-UP CONTRACT (XPLL)/LOCKED - your tokens that are still vested.
-
Selecting the drop-down arrow under the POOL NAME:
- OPERATOR - the validator's address.
- POOL STAKE - the amount of XPLL staked with the validator.
- COMMISSION FEE - the percentage of your rewards the validator will take as a commission fee.
-
Your deposited XPLL will be shown in the DEPOSIT field.
-
Select WITHDRAW to withdraw XPLL from your validator deposit.
- If you are withdrawing from the validator to a lock-up contract, the amount is automatically filled for you in the WITHDRAW MAX field. According to the period when you withdraw your XPLL, the withdrawal may be split between your lock-up contract's locked and unlocked tokens.
- Press NEXT to continue
Step 3: Confirm Your Transaction
-
The following fields will appear:
- Nonce - This field will be automatically populated for you.
- Max Base Fee per Gas- This field will be automatically populated for you based on the current Base Fee per Gas of the network.
- Priority Fee per Gas- This determines the priority of your transaction, and the minimum fee is 0 XPLL.
- Gas Limit- This field will be automatically populated for you.
-
Once you are satisfied with the populated fields, press NEXT at the bottom
- Preview the summary of the transaction, then press CONFIRM to continue, or CANCEL to make edits
- The status of the token withdrawal will be shown as PENDING. When it is validated by the network, a SUCCESS will be shown under its status tab. Due to the network state when your transaction gets included, the actual amount may differ slightly from your desired amount.
Watch the video tutorial to withdraw your XPLL here.
Unstaking Your XPLL
Step 1: Navigate to your chosen validator
- On the main page, select the STAKES tab which is located beside the TRANSACTIONS tab. Then select the pool which you wish to top up XPLL.
-
The pool information will be shown, along with fields relevant to you. This includes:
- DEPOSIT - the amount of XPLL you have deposited with the validator.
- TENTATIVE STAKE - the balance you have in the pool at this moment which will become part of the current stake in the future.
- CURRENT STAKE - the balance in the pool which has become part of the current validator set, and is now earning rewards.
- If you would like to auto-stake your rewards, toggle the AUTO STAKE REWARDS field on.

-
To unstake XPLL, tap on the arrow beside the TENTATIVE STAKEfield.
Step 2a: Unstake XPLL To Your Balance Account
-
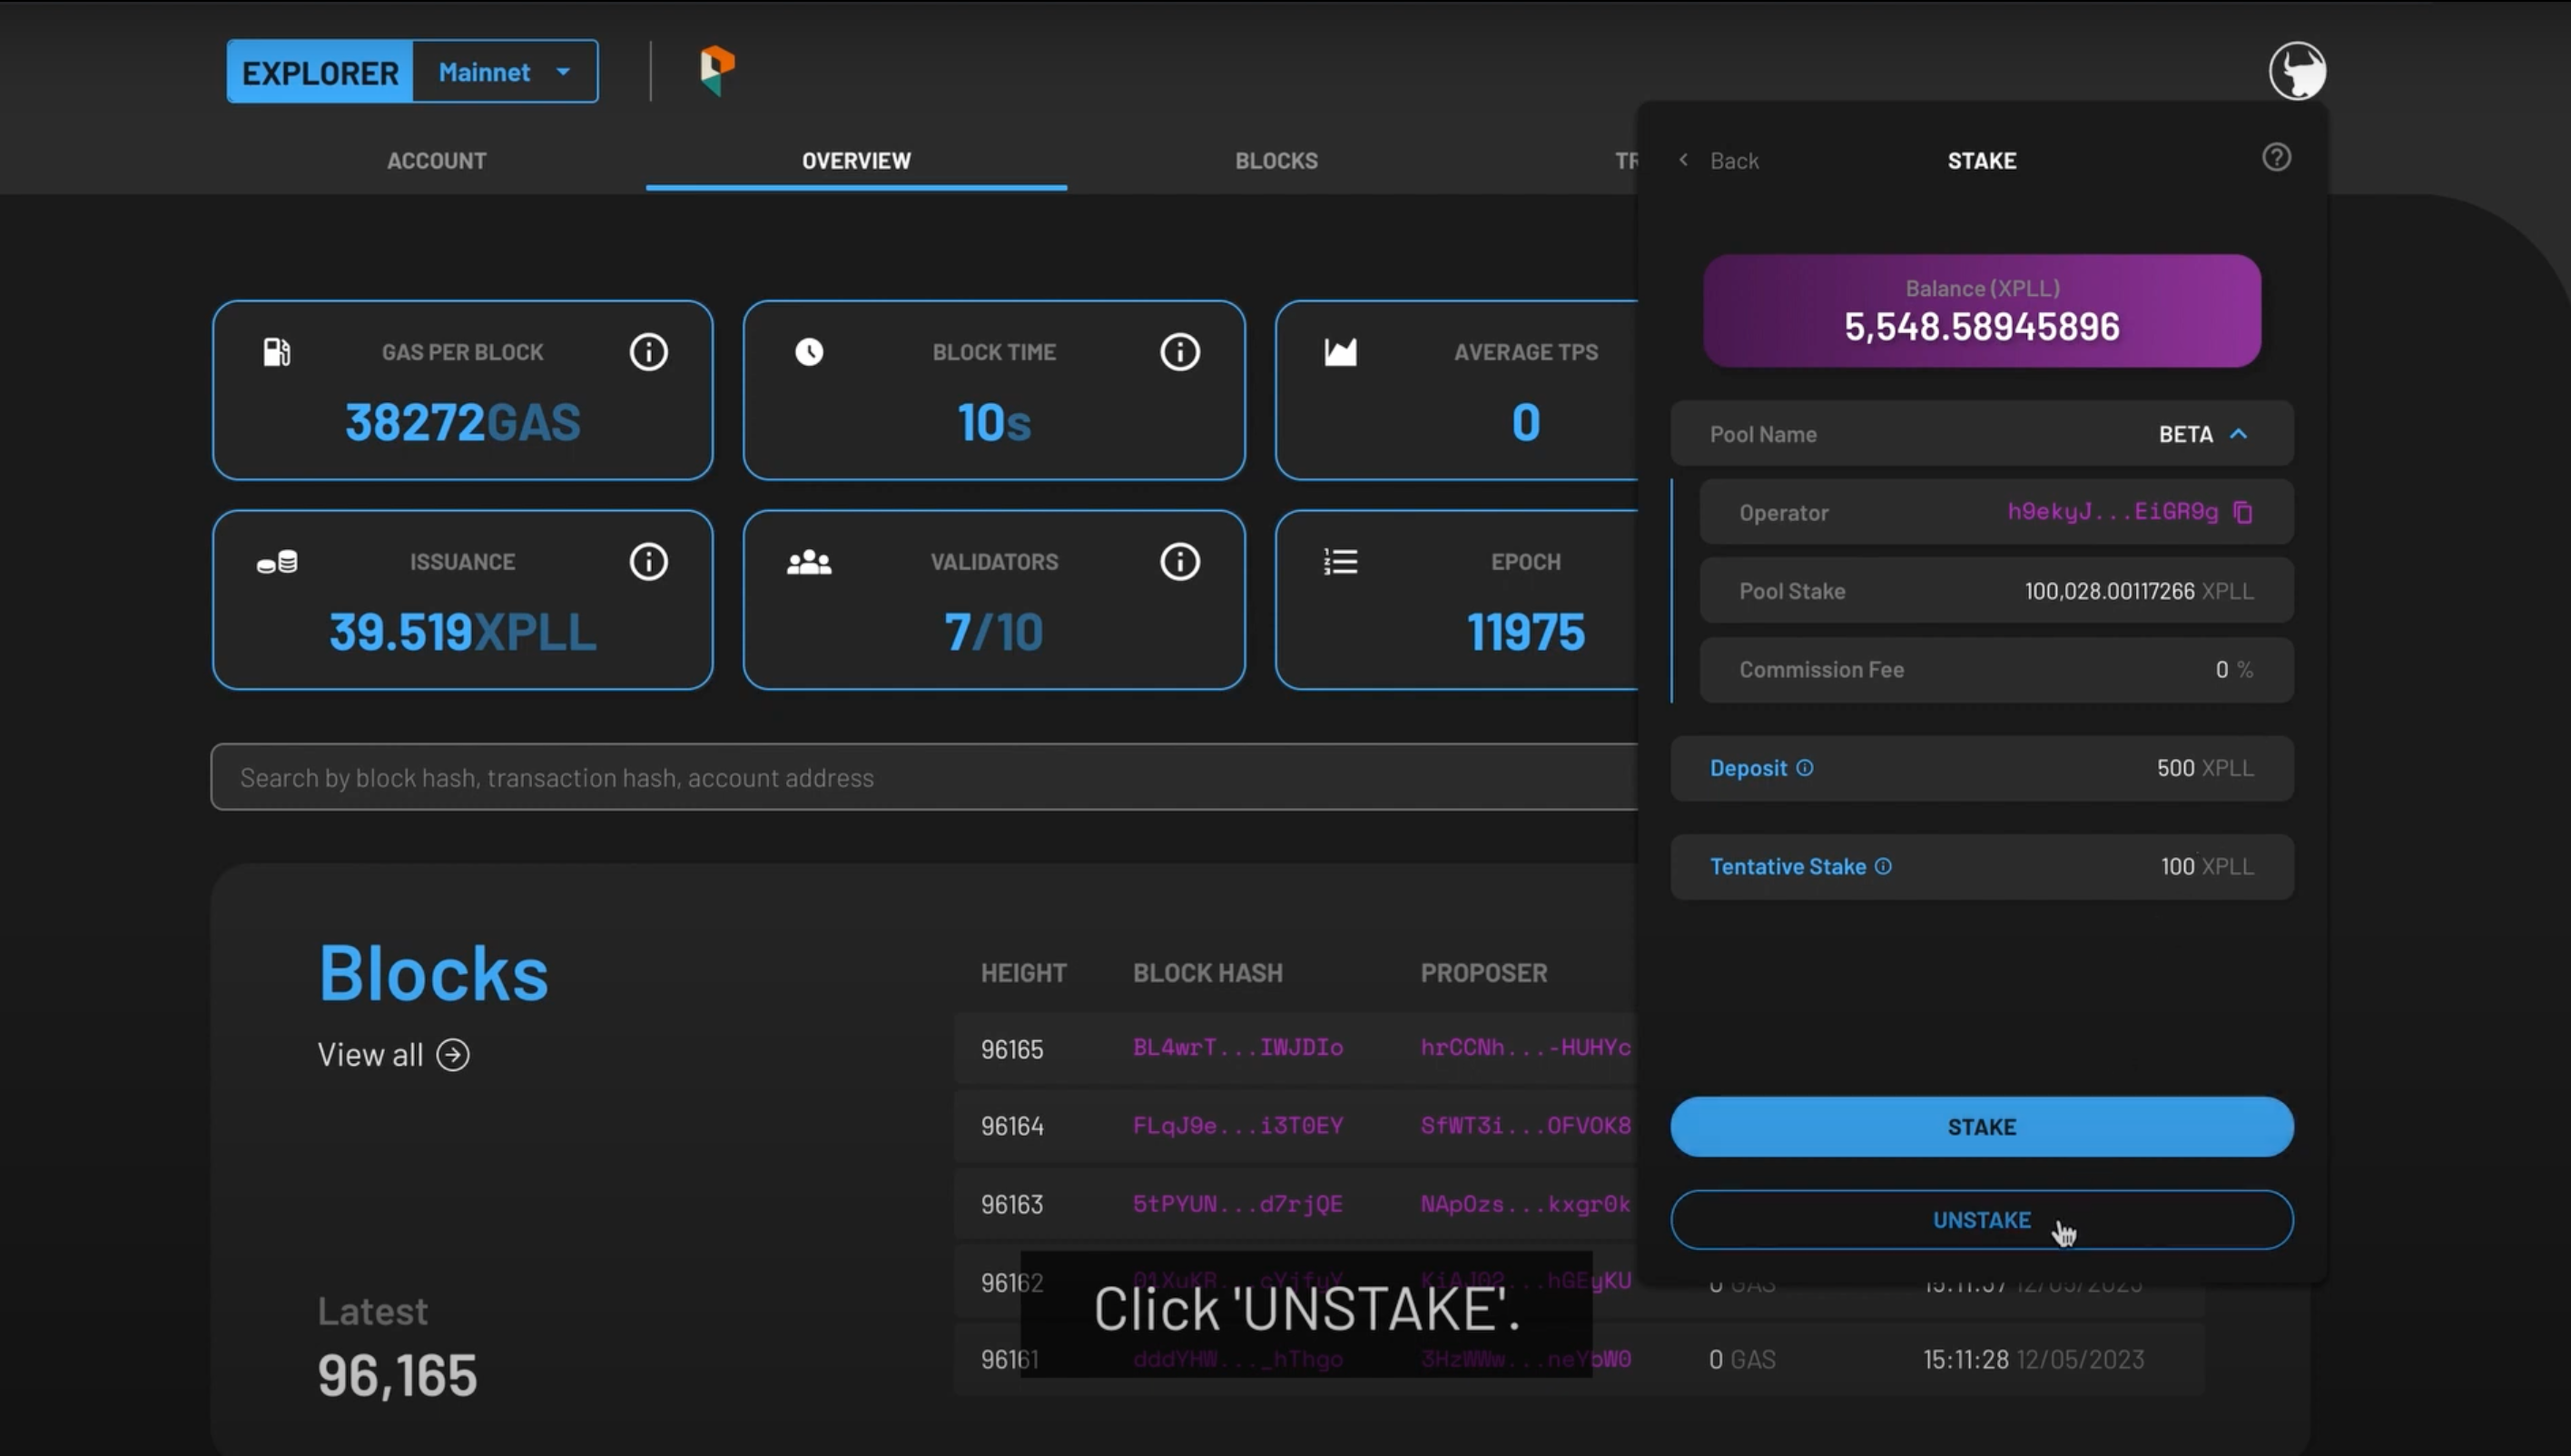
The details of the validator pool will be displayed as shown:
-
Selecting the drop-down arrow under the POOL NAME:
- OPERATOR - the validator's address.
- POOL STAKE - the amount of XPLL staked with the validator.
- COMMISSION FEE - the percentage of your rewards the validator will take as a commission fee.
-
Your deposited XPLL will be shown in the DEPOSIT field.
-
-
You have the option to add more staked XPLL or unstake them with the STAKE and UNSTAKE buttons respectively.
- To unstake XPLL, select the UNSTAKE button. Enter the amount of XPLL you wish to unstake in the UNSTAKE MAX field. The number cannot exceed the amount of XPLL you have staked.
- Press NEXT once you are comfortable with the amount.
Step 2b: Unstake XPLL To Your Lock-Up Contract
-
The details of the validator pool will be displayed as shown:
- LOCK-UP CONTRACT (XPLL)/LOCKED - your tokens that are still vested.
-
Selecting the drop-down arrow under the POOL NAME:
- OPERATOR - the validator's address.
- POOL STAKE - the amount of XPLL staked with the validator.
- COMMISSION FEE - the percentage of your rewards the validator will take as a commission fee.
-
Your deposited XPLL will be shown in the DEPOSIT field.
-
You have the option to add more staked XPLL or unstake them with the STAKE and UNSTAKE buttons respectively.
- To unstake XPLL, select the UNSTAKE button. If you are unstaking from the validator through a lock-up contract, the amount is automatically filled for you in the UNSTAKE MAX field.
- Press NEXT to continue.
Step 3: Confirm Your Transaction
-
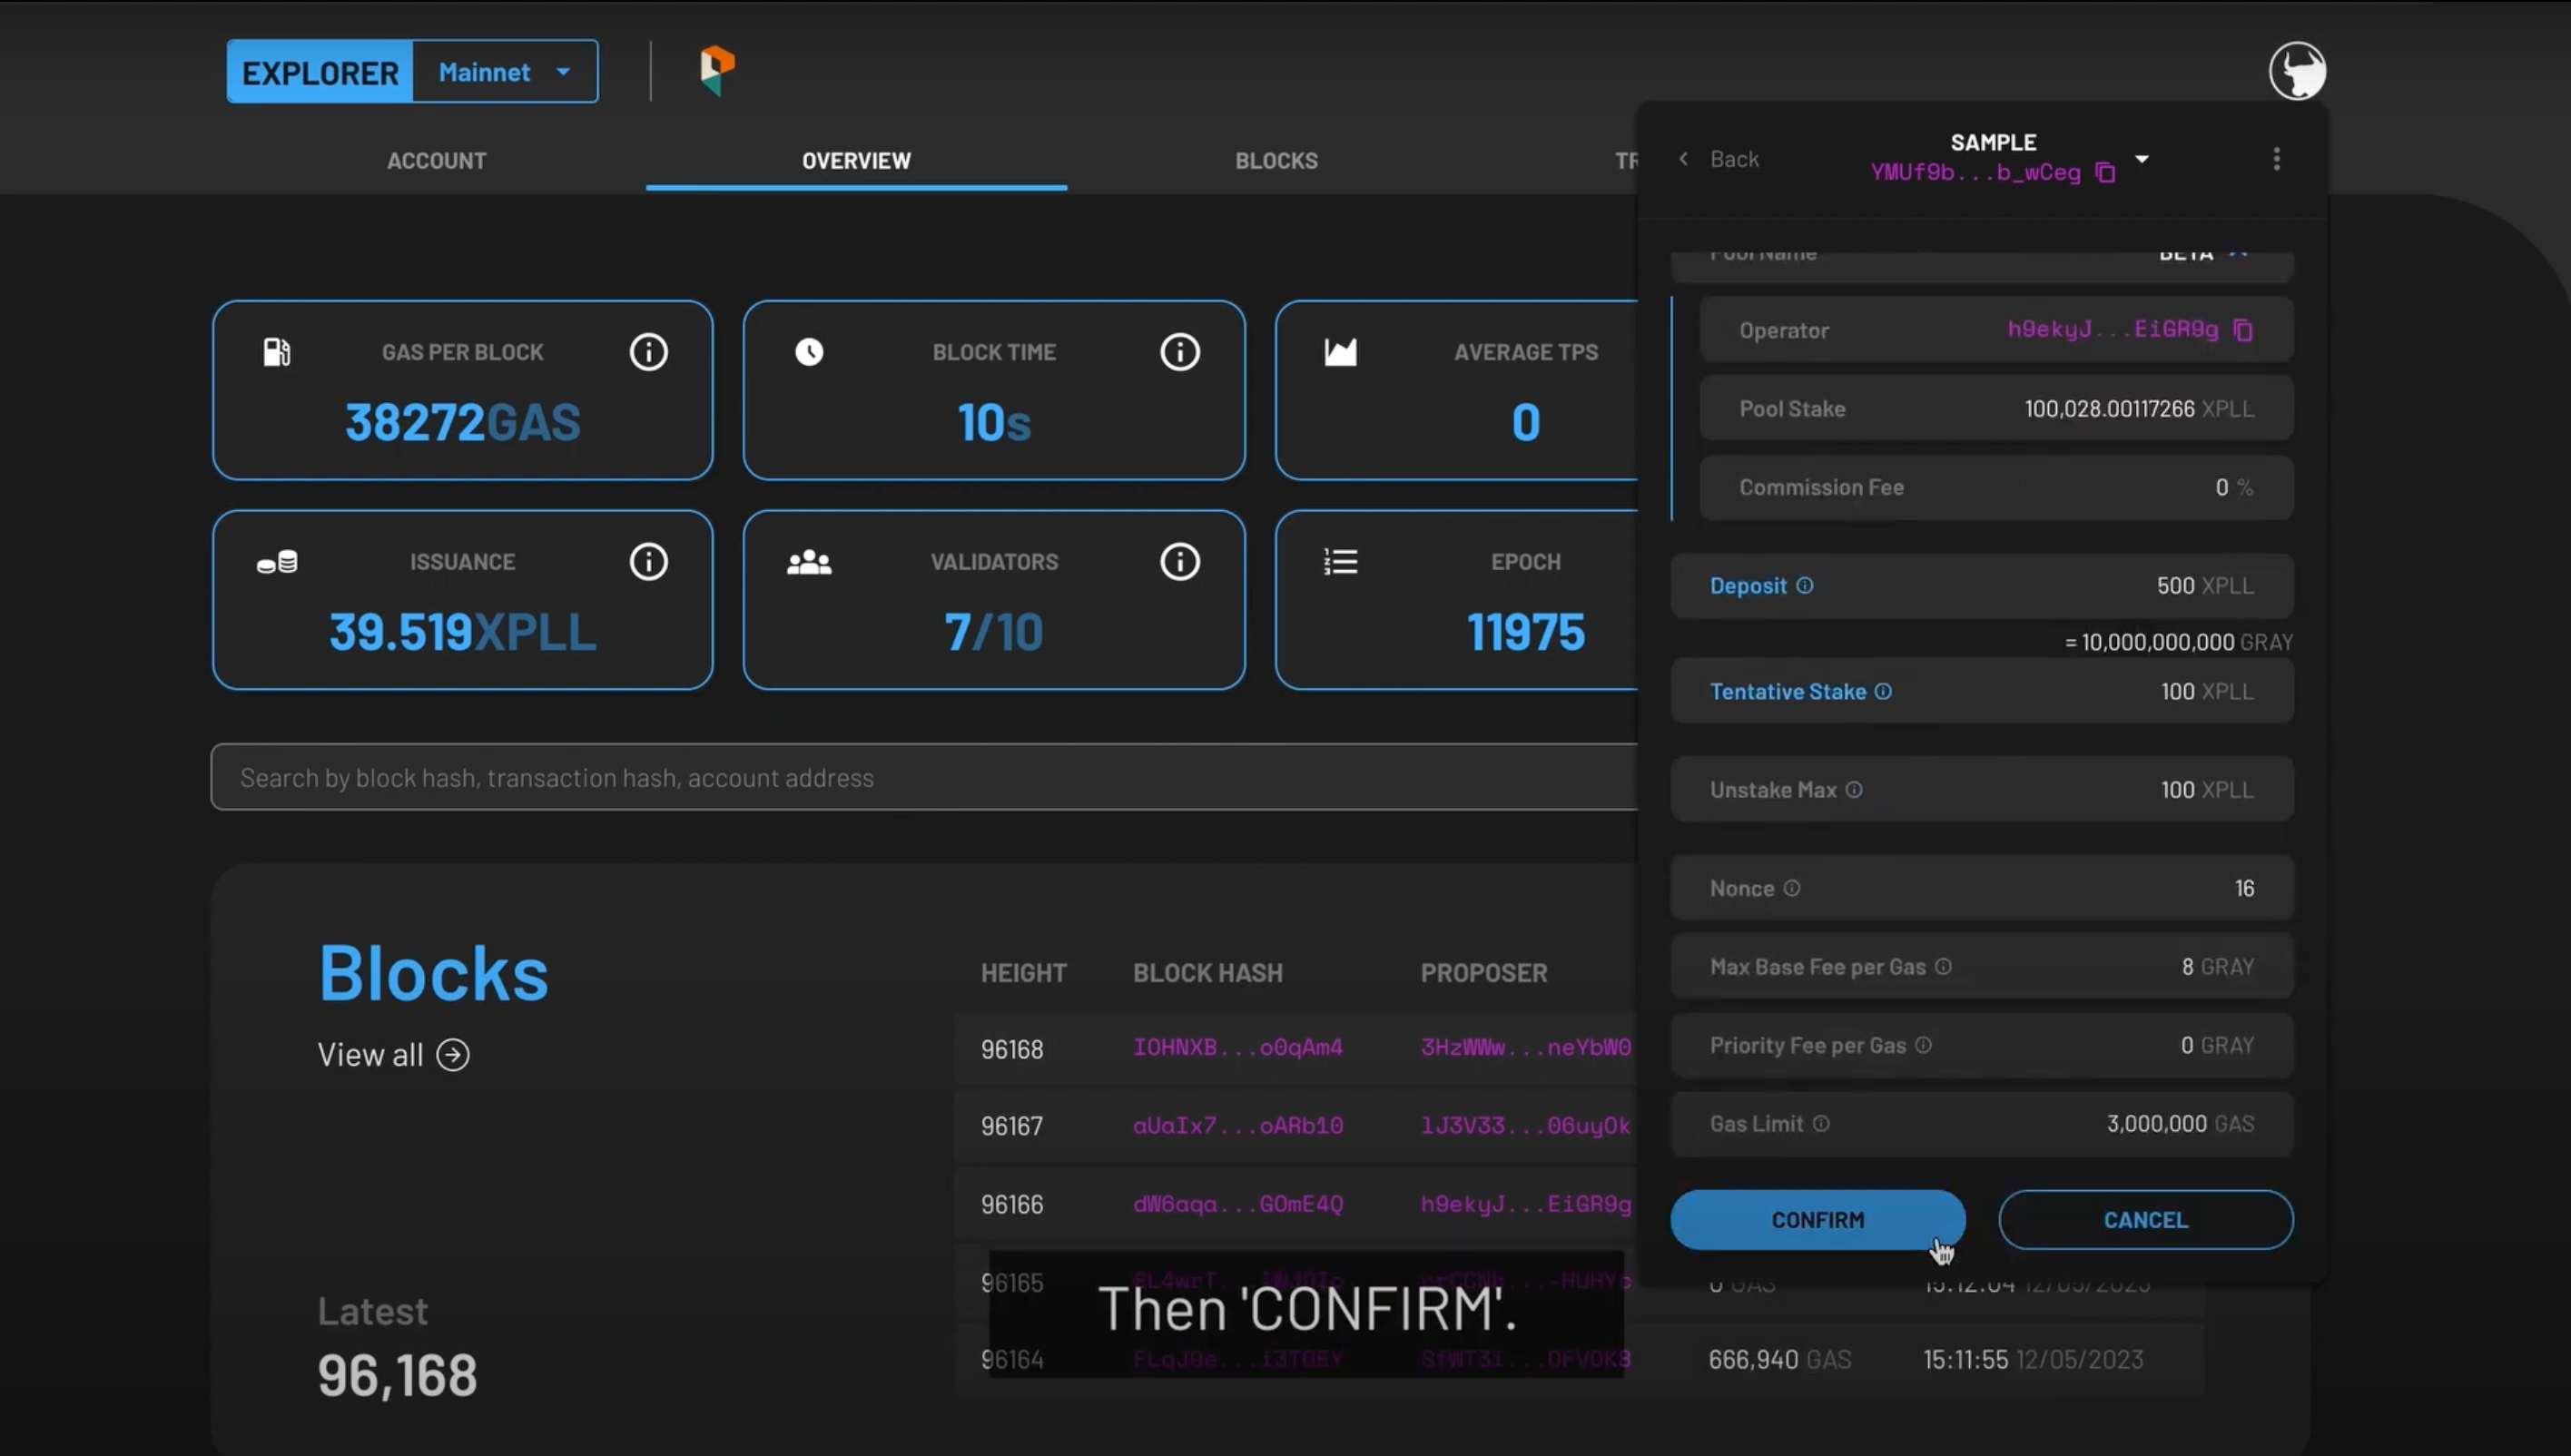
The following fields will appear:
- Nonce - This field will be automatically populated for you.
- Max Base Fee per Gas- This field will be automatically populated for you based on the current Base Fee per Gas of the network.
- Priority Fee per Gas- This determines the priority of your transaction, and the minimum fee is 0 XPLL.
- Gas Limit- This field will be automatically populated for you.
-
Once you are satisfied with the populated fields, press NEXT at the bottom.
- Preview the summary of the transaction, then press CONFIRM to continue, or CANCEL to make edits.
- The status of the token deposit will be shown as PENDING. When it is validated by the network, a SUCCESS will be shown under its status tab. Due to the network state when your transaction gets included, the actual amount may differ slightly from your desired amount.
- The request to unstake will take approximately two epochs to be confirmed.
Watch the video tutorial to unstake your XPLL here.
FAQ
Why am I not able to stake XPLL tokens?
You will need to retain a certain amount of XPLL in your account balance to pay for transaction fees. Ensure that you have reserved a small amount of XPLL tokens to pay for the gas fee of your deposit, stake, or unstake XPLL tokens.
How do I know which validator to stake with?
The validators securing ParallelChain Mainnet are trusted participants which are required to stake a significant number of XPLL. You may check the yield and commission fee of each validator by tapping on the drop-down arrow of the Operator field.
How long is the unstaking period?
The staking duration is measured by epochs. If you stake and unstake within the same epoch, the waiting time is considerably shorter. If the staking and unstaking are not within the same epoch, you will need to wait at least for another two epochs before unstaking.
How long is an Epoch?
One full epoch lasts approximately one day before it enters the next epoch. The epoch itself is a protocol-defined period for measuring performance of operators on the network.
How do I withdraw my staking rewards?
You can withdraw the rewards you have earned from staking by unstaking them to your Token Deposit. Additionally, you may toggle the AUTO STAKE REWARDS to avoid the process of unstaking your rewards. From there, you can then withdraw the amount to your wallet. Please refer to the section of Unstaking Your XPLL and Withdrawing Your Stakes for the required steps.
Can I move my staked XPLL to another validator?
Yes, you can. You will need to unstake your XPLL tokens, withdraw them to the Token Deposit, then back to your wallet. You can then transfer those tokens to a Token Deposit with another validator before staking your tokens with them. Please refer to the sections above to move your XPLL to another validator.
The status is still showing PENDING. Why is my transaction not confirmed yet?
Transactions are prioritised by the amount of Priority Fee per Gas paid, and lower priority transactions may need more time to be confirmed. You may choose to pay a higher Priority Fee during peak periods for a faster transaction, or you may check your wallet address on the blockchain explorer to monitor its transaction status.